On this page
- The templates list
- How a template is structured
- Order and dependencies
- Deleting definitions — running cases stay untouched
- Reusing structure: duplicate, copy, multi-select
- Task type: done by a person or automatically
- Tasks completed externally
- What a task captures — the form
- Settings almost every field has
- The field types in detail
- Numbers, ratings and scales
- Date and Yes/No
- Choice fields
- Evidence and signature
- Structure and notes
- Calculated and repeatable fields
- Values from the case and from external systems
- Options in choice fields
- Validation and format
- Conditional visibility and requirement
- Carrying a field across several tasks
- Category and structure map
- Generating a template automatically
- Refining and publishing existing templates
- A template's history
- Sharing a template
- Good templates
The templates list
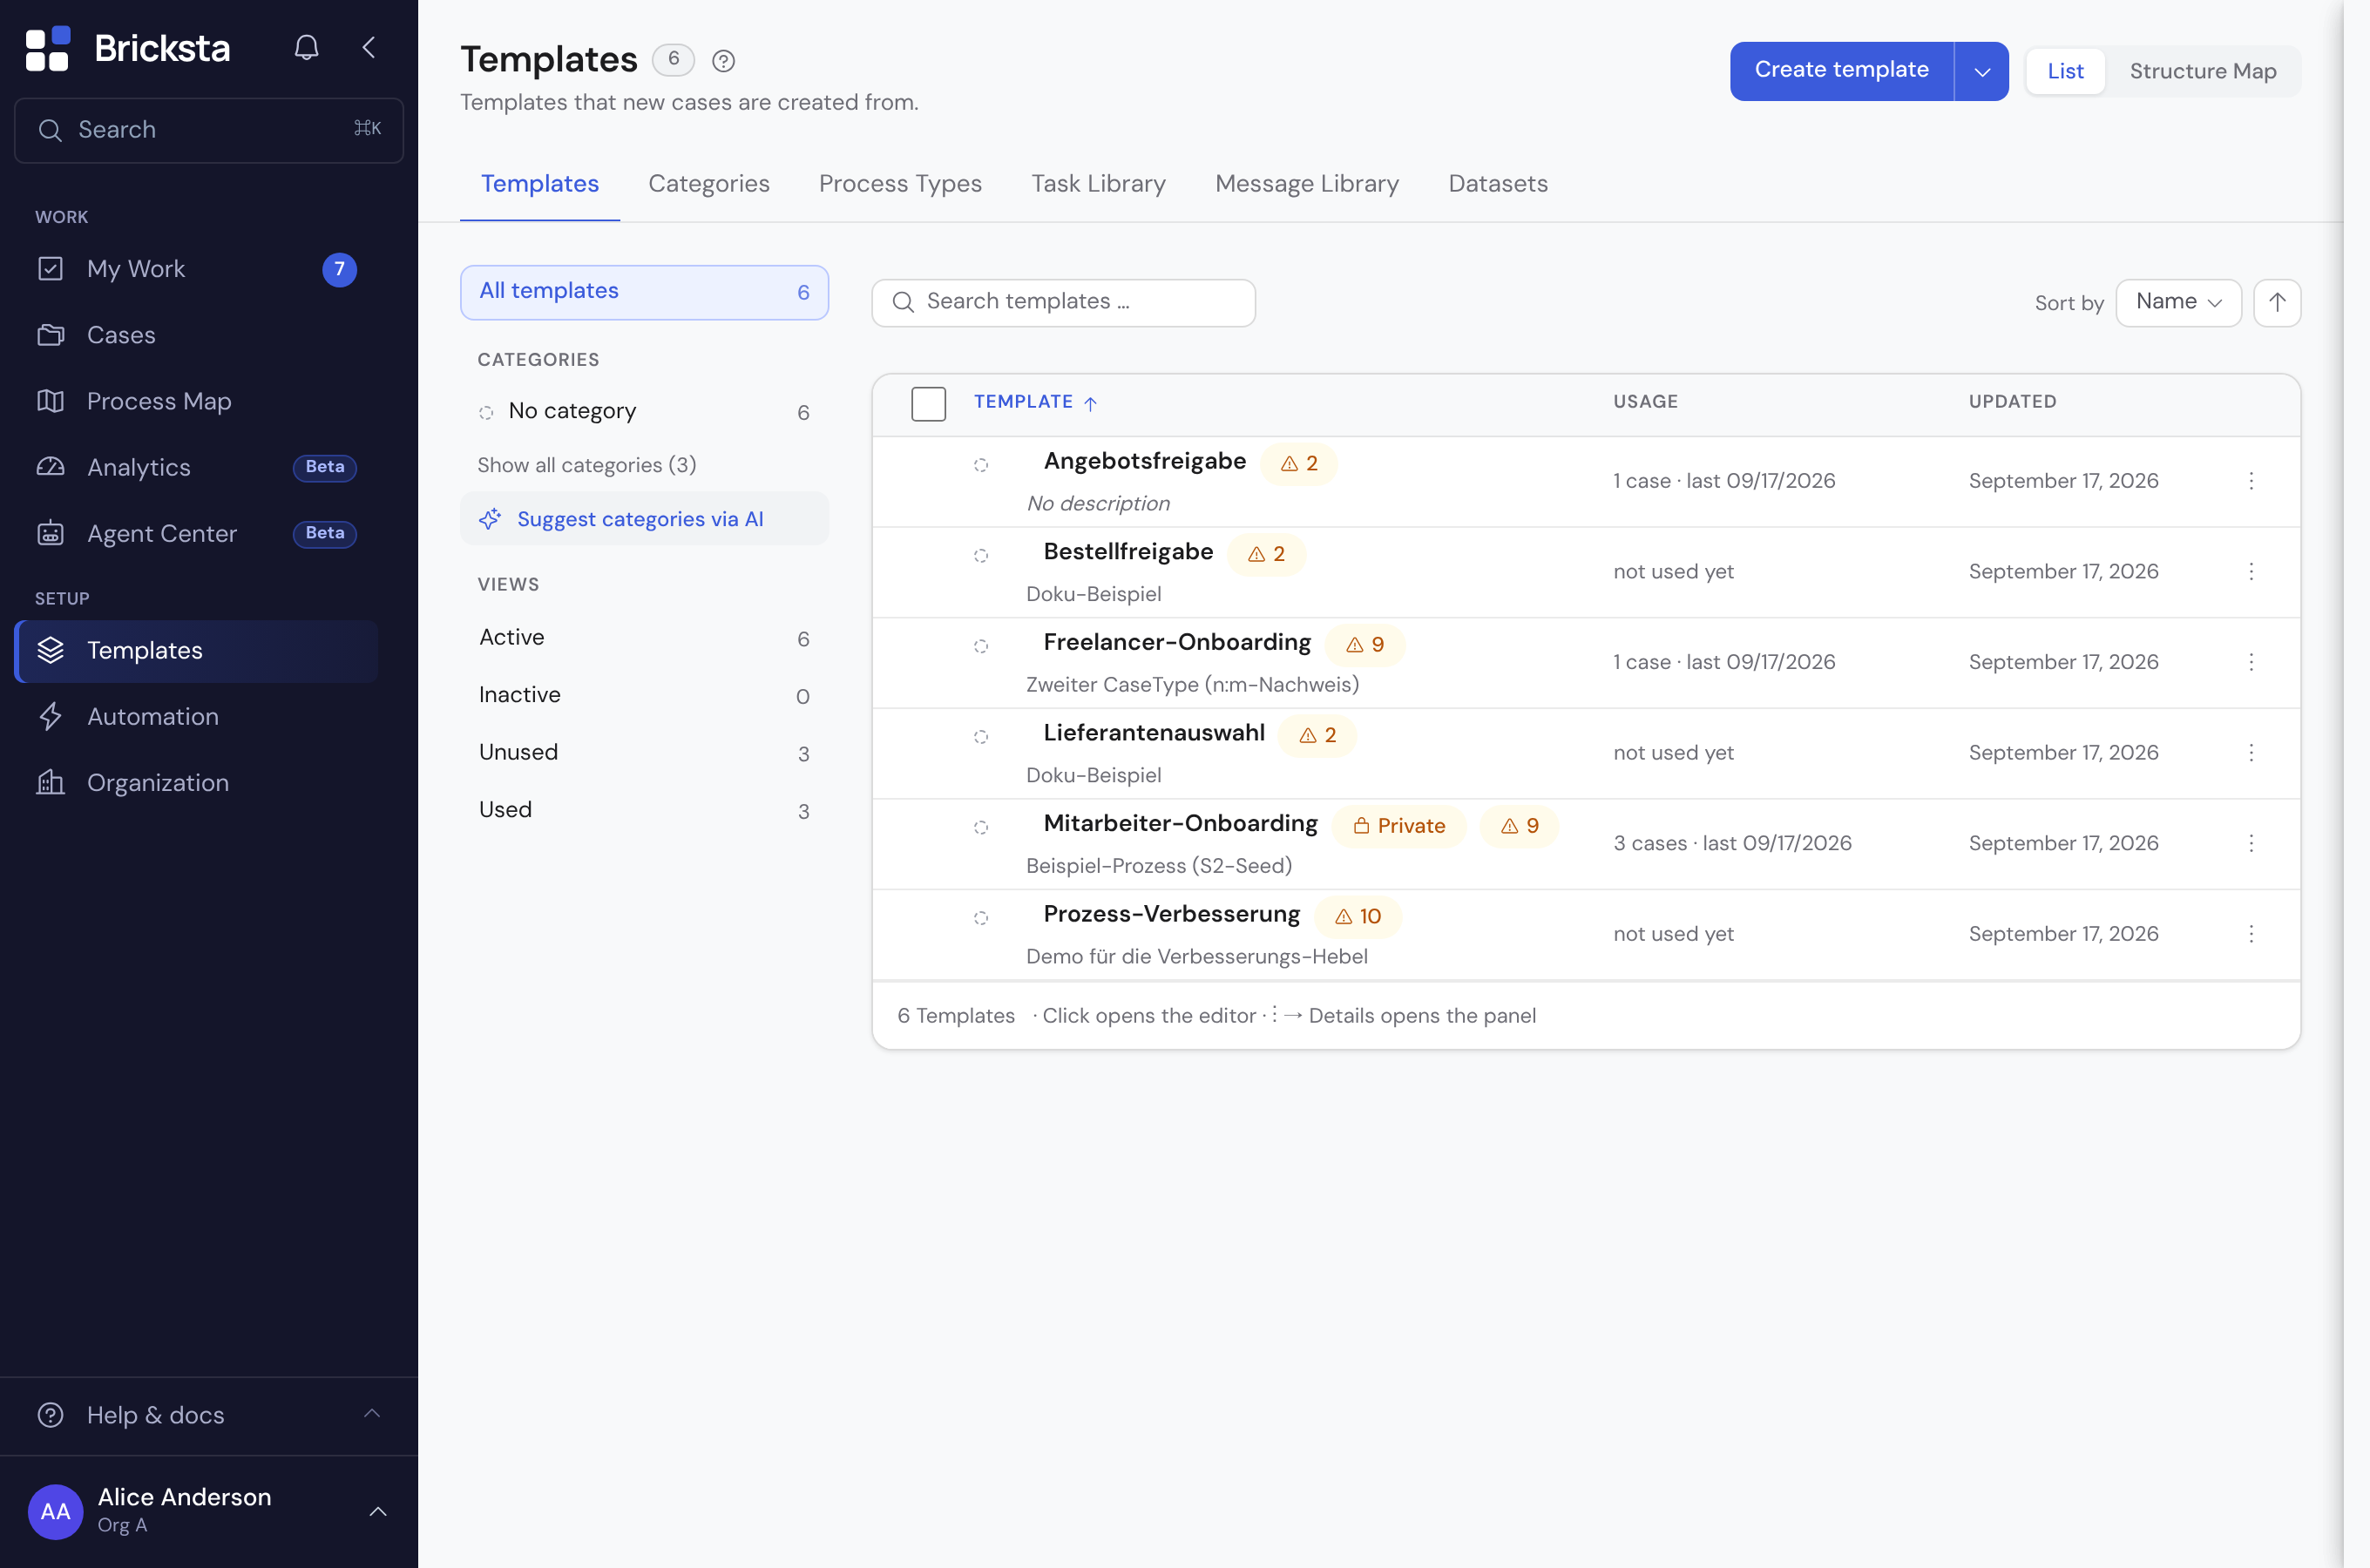
Under Templates you find all the blueprints of your organization. Each row names the category, the usage and the last change. Clicking the row opens the template editor — that is the main action of this overview; to make that visible the row is shaded on hover, exactly as in Cases and My Work. If an active template has findings from the check, its row carries a coloured marker with the count: red means errors — no case can currently be created from this template; amber means hints — cases are created, but something inside will not work as intended. Clicking the marker opens the template with the check results already in place. On a computer only the number is shown and the wording appears on hover; on tablet and phone it is spelled out. Only people allowed to manage templates see the marker. Via “Create template” you open a short choice with two paths: “Start blank” builds the template by hand, “Describe with AI” generates a complete one from a description. The ⋮ menu of each row bundles every further action: “Details” opens a panel with the template's key facts, “Edit” leads into the editor (the same as clicking the row), “Create case” starts a case from the template — for the frequent case the route via Cases leads there too. “Duplicate” creates a full copy of the template including workflows, phases, tasks and fields. The copy takes over the original's active state — the copy of a deactivated template is deactivated as well. It appears right below the original and is instantly renameable; if it falls through a filter you currently have set, you won't see its row — a short notice then confirms that the copy was created. “Deactivate” hides the template from case creation, “Delete” removes it. Duplicating, deactivating and deleting require the right to manage templates.
The list shows the templates of the active organization. If you open a link to a template in another of your organizations, a notice appears first, naming both organizations and offering a switch — only afterwards can you edit it. Without the switch every change would run against the wrong organization; see Settings and account, section Active organization.
How a template is structured
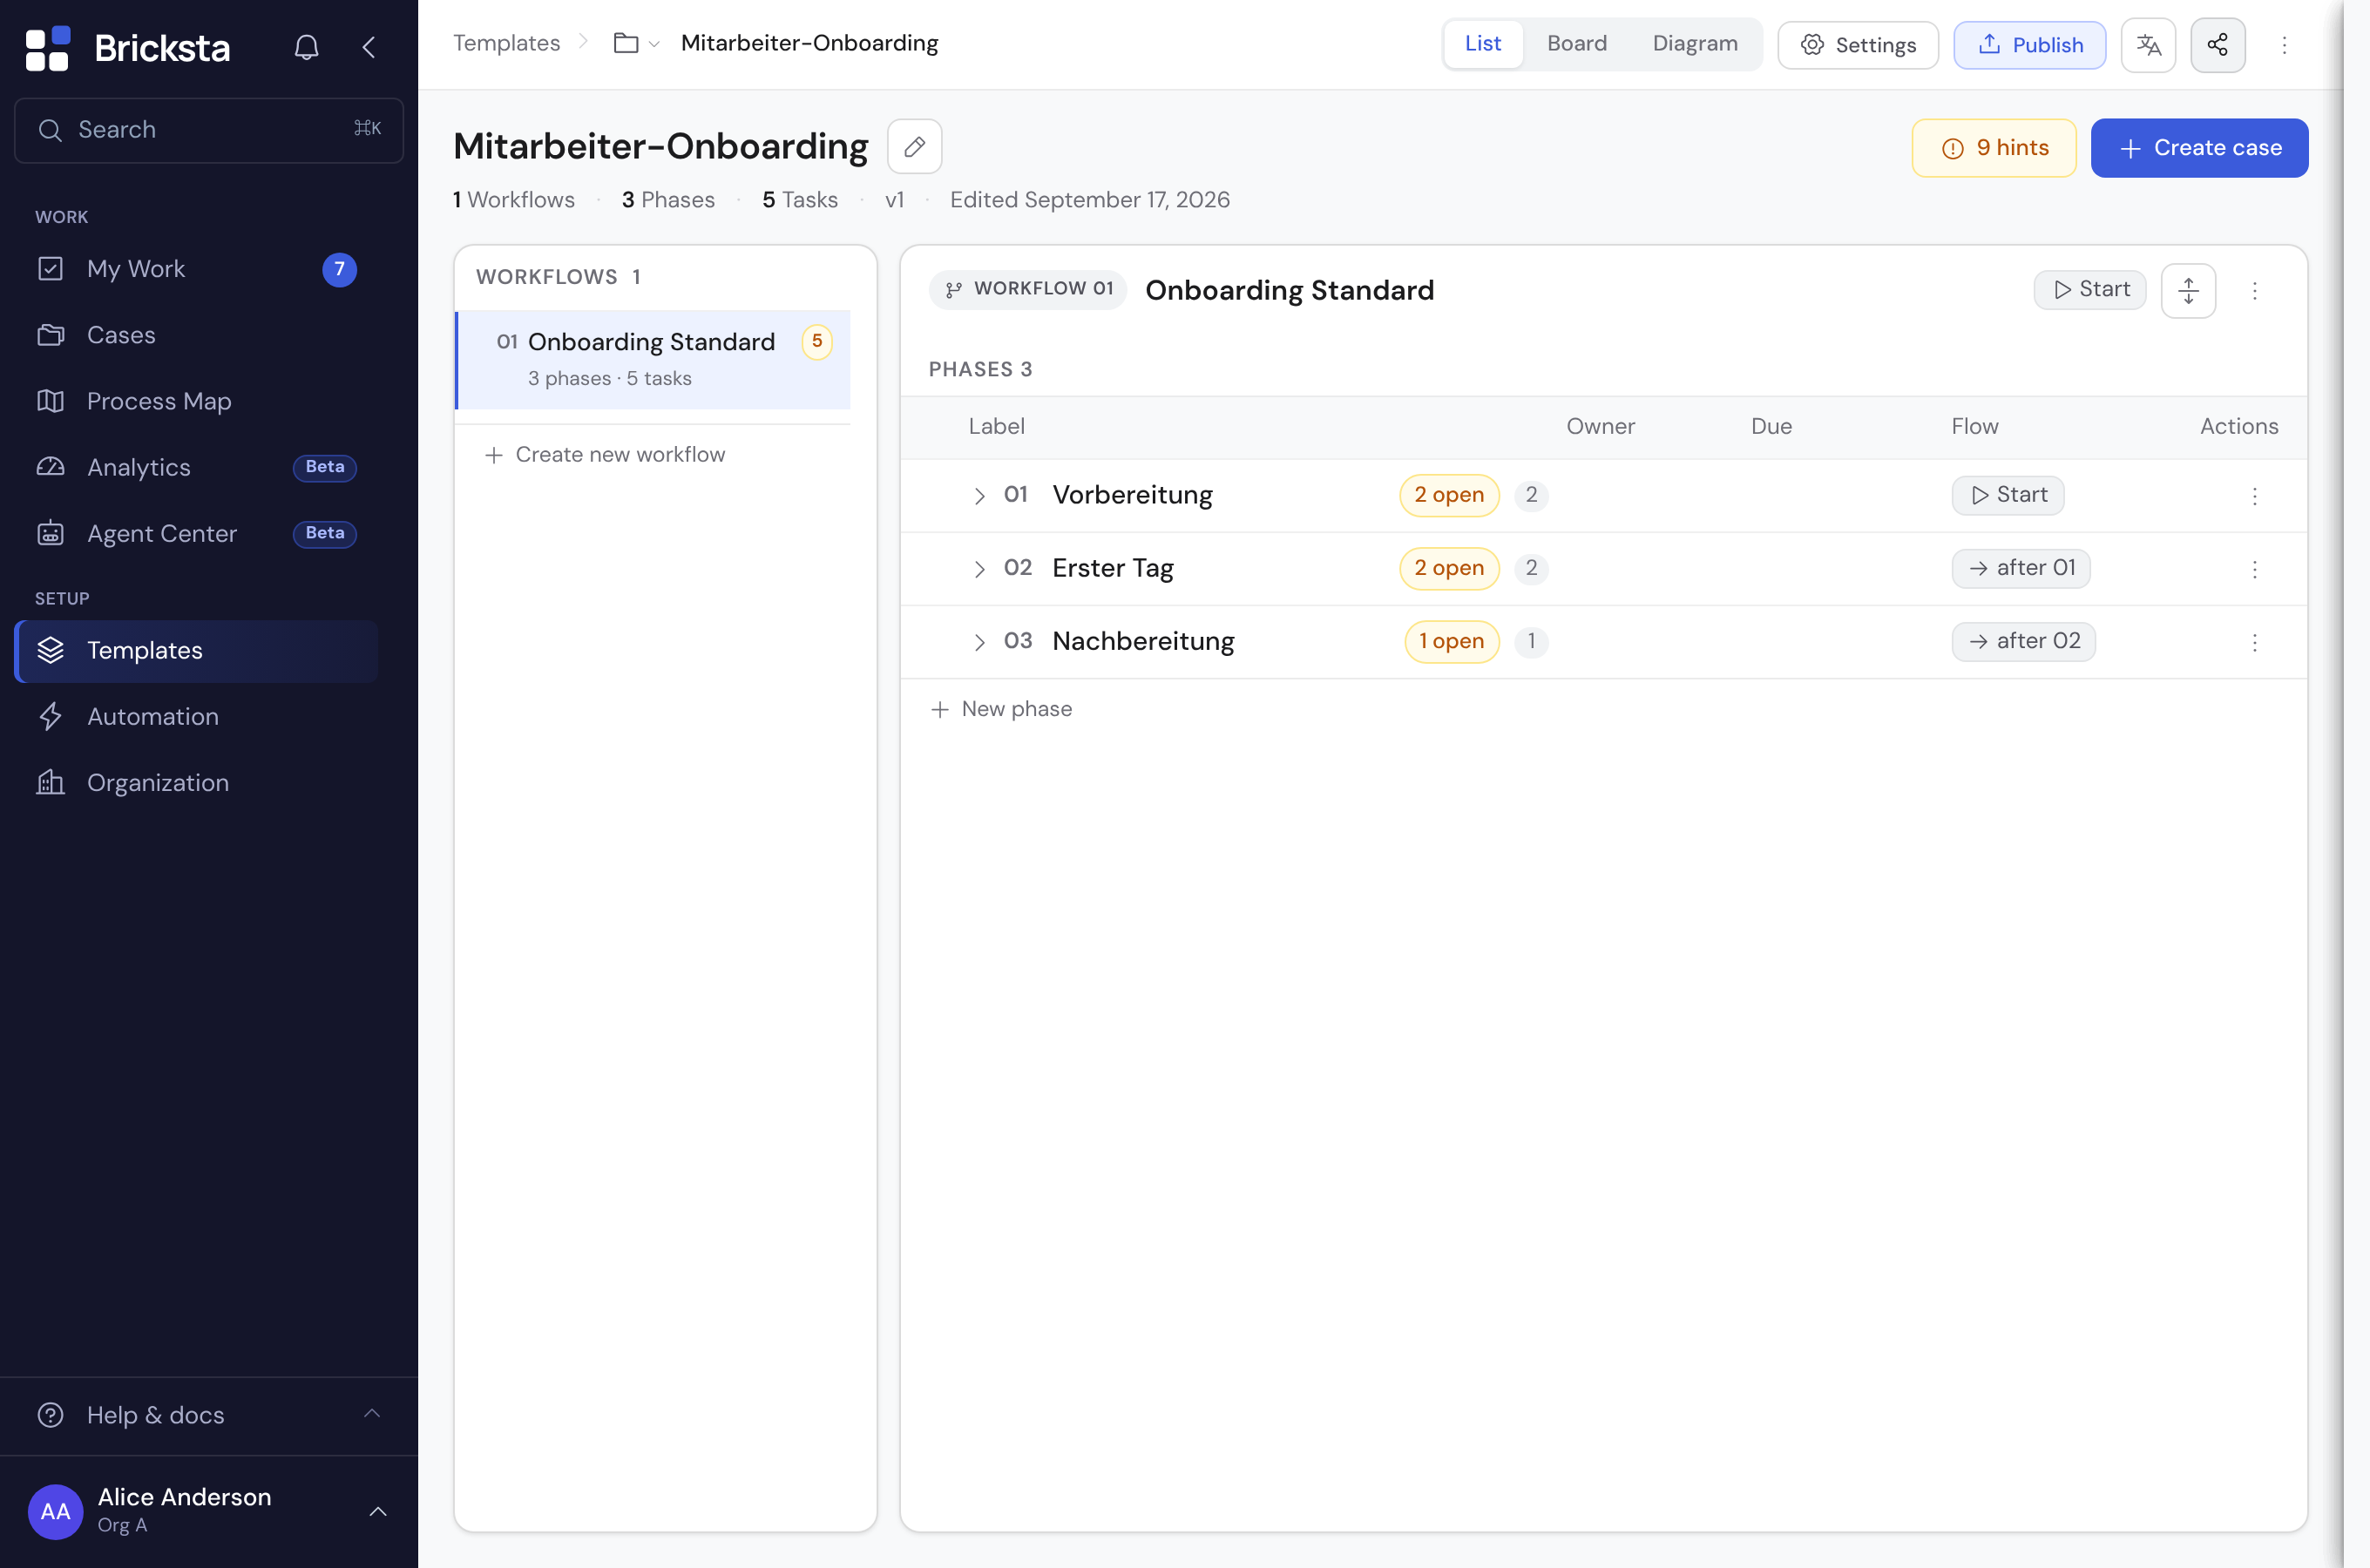
A template organizes a flow into three levels. That keeps even a large process clear and easy to structure.
- Workflow
- A coherent strand of the flow. A template can contain several workflows, which may also run in parallel.
- Phase
- A section within a workflow — it groups tasks that belong together (for example Preparation or Completion).
- Task
- The individual work step. Every task has an owner and can capture fields that are passed along the flow. The task dialog carries a description below the name: it explains in your own words what the task is about and is later shown to whoever works on it — on the task sheet under “My work” and in the task row of the case. It is optional; leave it empty and nothing appears there. If an AI refinement wrote a description, you can edit or delete it here.
This is how you build the structure: at the end of each list sits a “+” for the matching level — “Create new workflow” at the bottom of the workflow rail on the left, “New phase” below the phases and “New task” inside an expanded phase. Right after you click, the new entry's name is already selected: just type the name and confirm with Enter (or a click elsewhere). To rename something later, use the pencil icon that appears right behind the name on hover.
At the top of the editor sit the template's identity (name and icon) and the central actions. The name is the editor's heading and can be changed right there: the pencil next to it opens an input field, Enter (or a click elsewhere) commits, Escape discards. The values you typically set once — category, due date, priority, flow type, auto-start, visibility and GDPR retention — live together with the description behind “Settings”, under the “Defaults” tab. “Publish” automatically checks the template first; the separate “Check template” action remains in the three-dot menu for deliberate checks. This keeps the header lean and the actual structure of workflows and phases in focus.
The due date — both the case type's default in the properties and the per-task deadline — reads as a sentence and is relative: you set an offset (“Due in 3 days …”) and an anchor it counts from. A task's anchors: when the task itself opens (“after this task opens”), when the case is created (“after the case is created”), when the workflow opens an earlier task (“after opening of …”), the completion of an earlier task, an earlier phase or an earlier workflow (“after completion of …”) or a “date field” of the case. Phase and workflow anchors only offer phases or workflows that come earlier in the flow. With the date-field anchor you can also make it due “before” that date (e.g. two days before the delivery date). The case default supports the “after the case is created” and “date field” anchors.
When a deadline anchors to a predecessor task's opening or completion, to the completion of an earlier phase or workflow, or to an empty date field, it stays pending at first and is computed automatically once the anchor occurs — the task opens or completes, the phase or workflow finishes, or the date is filled in. If an anchored field date later changes, the deadline follows automatically.
The GDPR retention in the template settings (Defaults tab) defines how long closed cases of this template are kept and then automatically anonymized or deleted. The dedicated article “Data privacy and retention (GDPR)” explains the periods and their irreversible effects in detail.
Order and dependencies
Use the “List / Diagram” toggle to switch to the graphical view. The header and its actions (“Settings”, “Publish”, share and the three-dot menu) stay in the same place and behave identically in both views — the diagram view simply gives the flow the full space. The diagram shows the flow as a graph — with the “Phases / Tasks” level toggle you switch between the coarse and the fine level. You decide which step follows which: a dependency links a predecessor to a successor.
Both views show the same spot in your work: when you switch from the list to the diagram, the diagram centres on exactly the object you were working with and picks the matching level — the task level for a task, the phase level otherwise. The order is: a selected phase or task (even if you have scrolled away since), otherwise an expanded task that is currently visible, otherwise whatever sits at the top of the list. Workflows ticked in the left column deliberately do not count — those tick boxes pick targets for bulk actions and say nothing about where you are looking. The other way round, the ↗ button on a node takes you back to the list — to that exact object, expanded and briefly highlighted. Whatever you had expanded stays expanded across the switch, so you return to the list the way you left it.
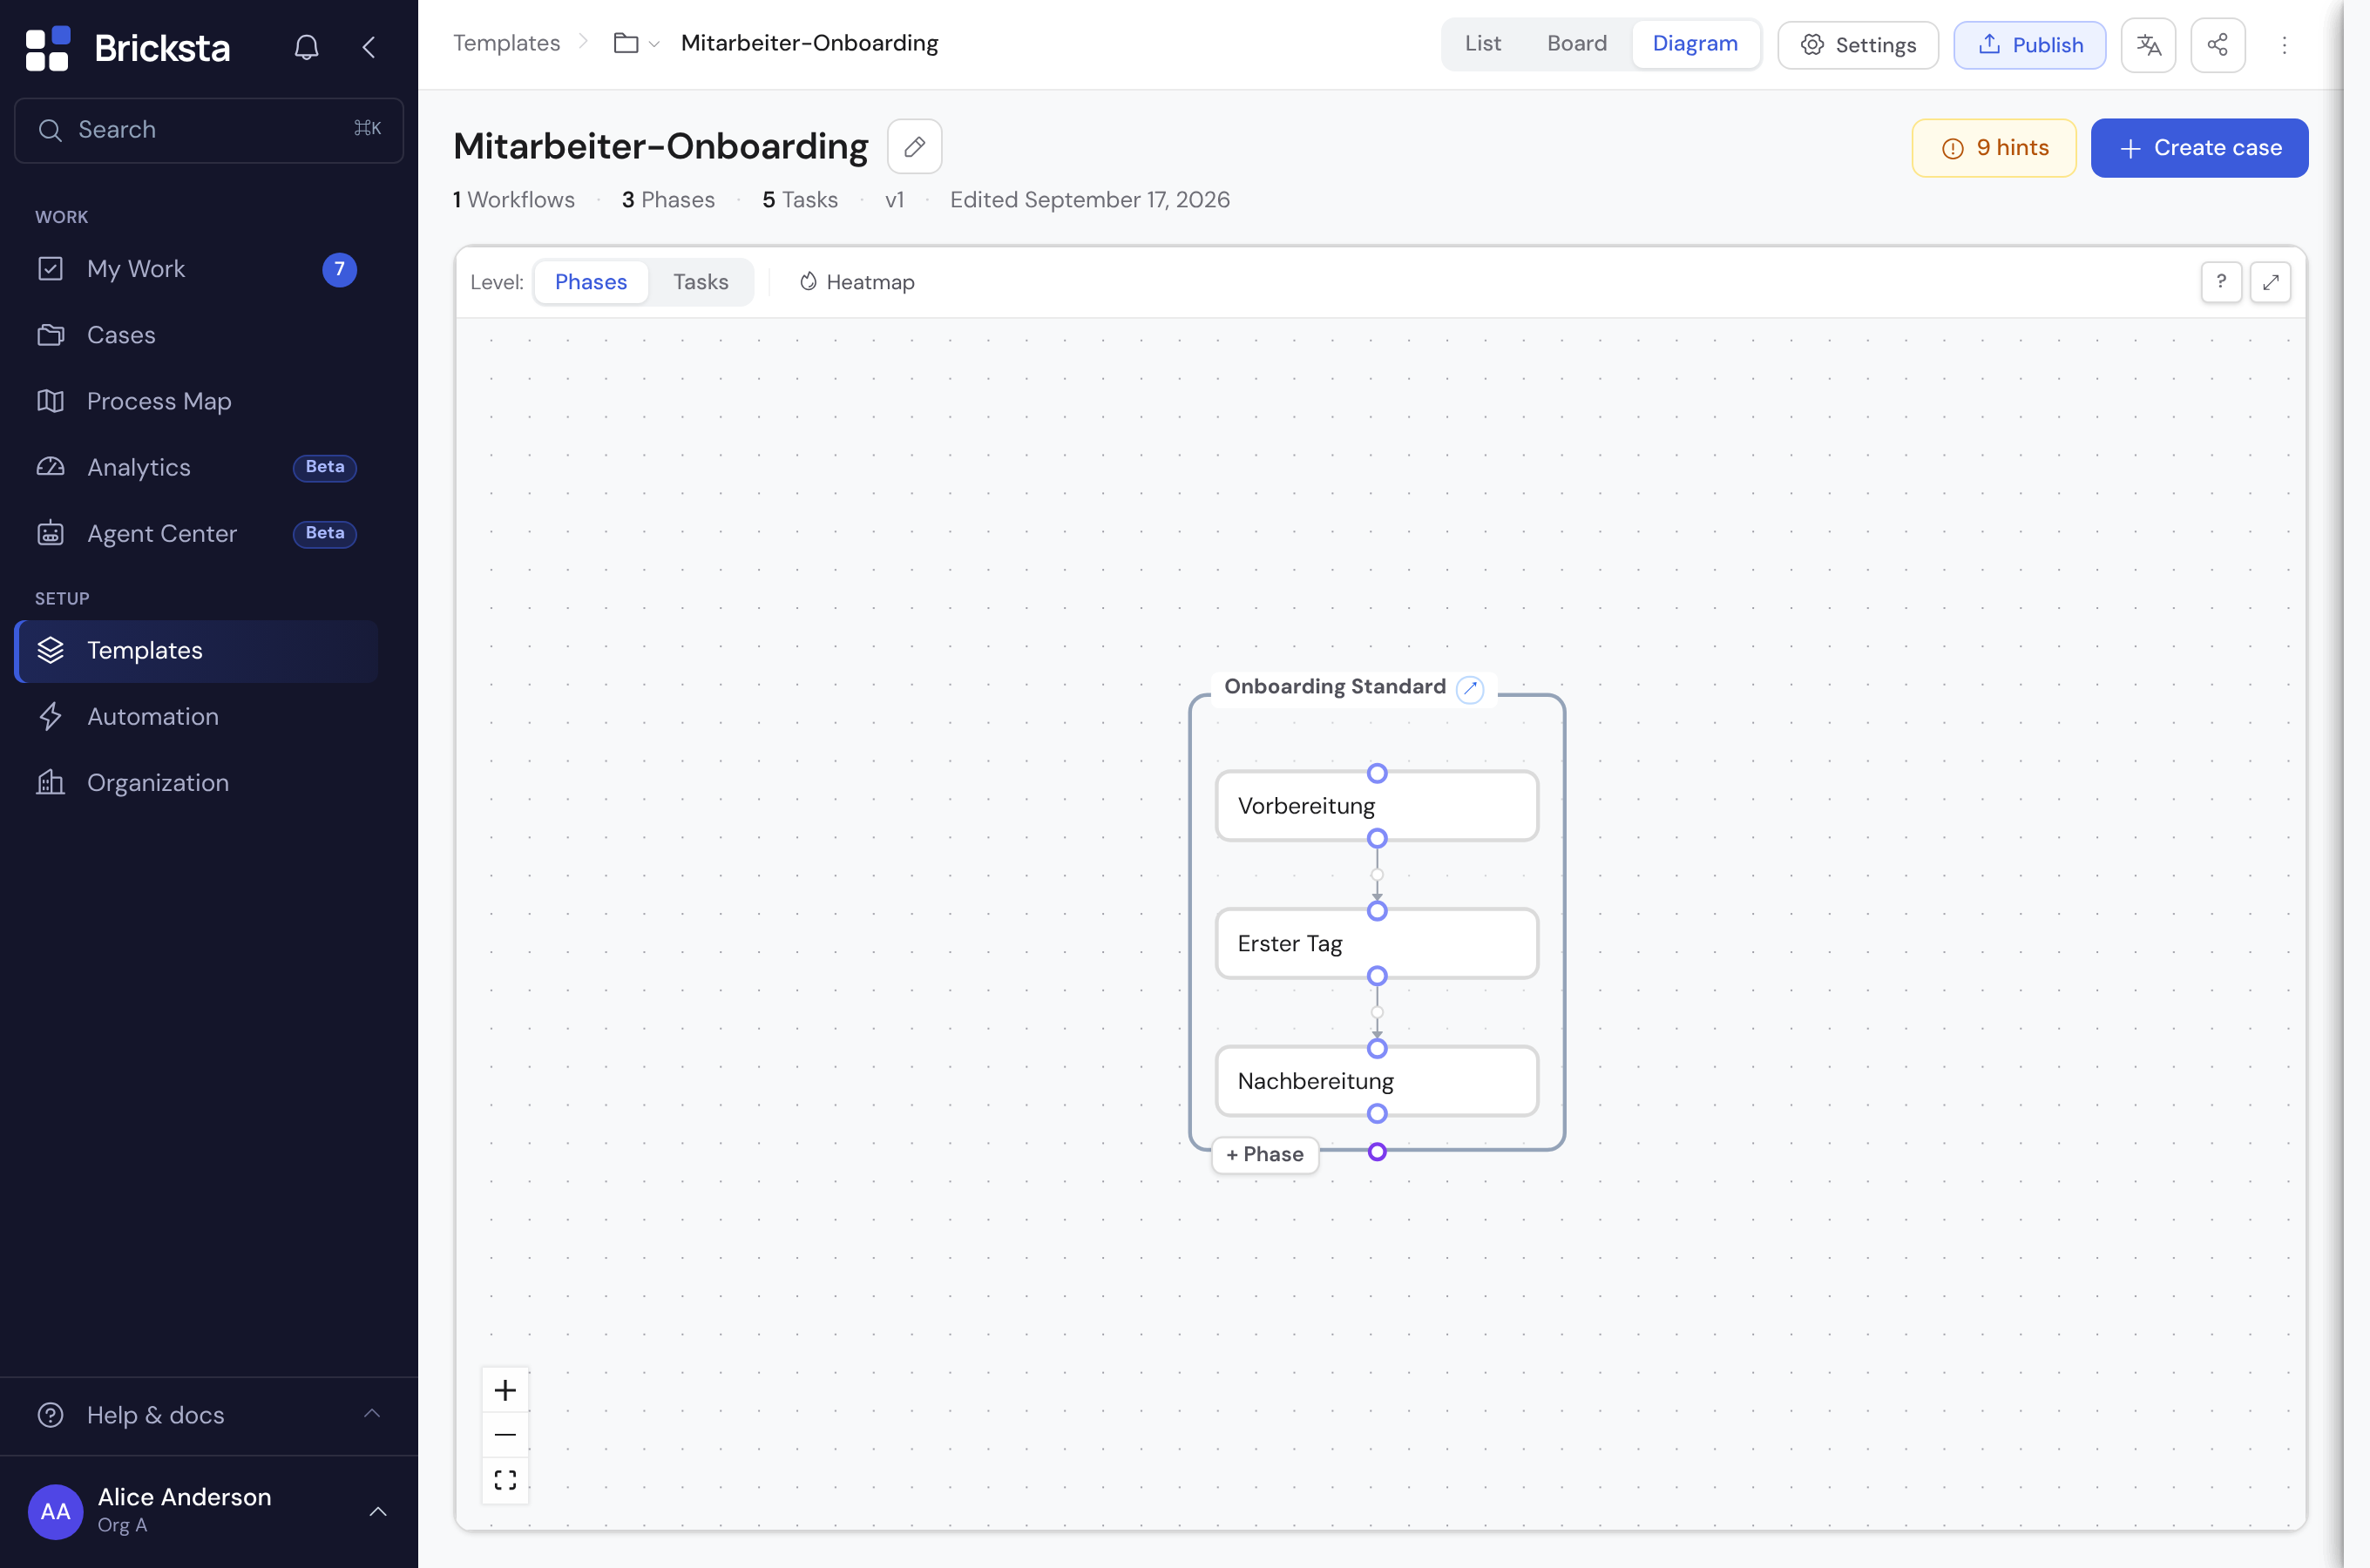
- In a running case a step is only released once its predecessors are done — so the flow unfolds by itself, without anyone steering it manually.
- Tasks are only linked within the same phase, phases only within the same workflow.
- Without a dependency, steps sit in parallel — they can be worked on at the same time.
- A dependency can be tied to a condition — the edge is then drawn dashed and carries the controlling data point (e.g. “Budget approved? is Yes”). Hovering over the condition also reveals its origin: which task in which phase supplies that value — even when that is an earlier phase than the one the edge is attached to. When the data point comes from a select field, the expected value offers its options directly; you can still type a custom value. If a stored value matches none of the field's options, the editor flags it — such a condition would never be met.
- The diagram arranges the steps automatically (auto-layout), so the structure stays readable even with many tasks.
- When a step leads into a branch — several successors of which exactly one will continue —, that now appears on the step where the decision is made: “either Contact manually or Contact CRM”. Until now the rule was visible only at the far end of the branch, where the paths merge again. Hovering it says what follows: exactly one of these paths continues, the others fall away.
- A back-jump connection is drawn as a dashed edge pointing back against the reading direction. It is not a dependency: it does not say “wait for …”, it says “on a rejection, go back there”. That is also why it does not change the order of the list — on a back-jump the work in between is invalidated and comes back pre-filled in a new round. You create one in the diagram by dragging a connection backwards — from the later step to the earlier one. As a dependency that would be a loop and is not allowed; instead Bricksta asks at that point whether it should become a back-jump, naming the consequence. The connection is only created once you confirm. To remove it, delete the edge like any other.
The list shows workflows, phases and tasks in EXECUTION ORDER: whatever waits for something sits below it. That order is derived from the dependencies you recorded — what a step waits for is shown in each row's “Flow” column. Where no dependency decides, the order you set yourself does; steps without a dependency run in parallel. Reordering — by dragging or via “Move up”/“Move down” in the ⋮ menu — is therefore more than a display choice: move a step above something it waits for and Bricksta reads that as “this should run first from now on” and reverses the dependency concerned. It tells you which one — with several it asks first, and the reversal can be undone right away. If the reversal would close a cycle, Bricksta refuses the move rather than building a flow that would never start. Move something that waits for nothing, and only the display changes, no dependency. To quickly turn parallel steps into a straight sequence, use the “Run one after another” button — it sits in the header of every level: workflows, phases and tasks (for workflows as an icon in the left bar or in the ⋮ menu). If a backward dependency already fixes part of the order so that no full chain is possible, a short note points that out. If the dependencies form a cycle (no resolvable order), a warning appears on the section. Collapsed, a row stays lean and shows only its counter — you already read the sequence from the order. Expand an object and the dependency editor below states what it follows: there the predecessor’s name is a jump link — it names the predecessor’s category (workflow, phase or task) and name, and a click opens and highlights that object.
To put a task in a different phase, simply drag it there. While you drag, a copy of the row follows the pointer and a gap opens in the target phase exactly where the task will land — what you see is what you get. The drop target decides the position: drop it on a task of the target phase and it is placed BEHIND that task; drop it on the header row of an expanded phase and it becomes its first task — that is the way to the first position; drop it on a collapsed phase row and it is appended at the end. Moving a task to another phase has three consequences, and Bricksta points them out up front: flow links between tasks only ever apply within one phase and are therefore released (the task then starts in the target phase as a step of its own); due dates anchored to a task or phase of the former surroundings lose their anchor; and if the task is bound to an intake form, that binding breaks as soon as it leaves the first phase. If any of these applies, Bricksta asks before the move and names how many. The same move — across workflow boundaries too — remains available as “Move to another phase” in the task dialog and as a bulk action in the selection bar; both ask in exactly the same way.
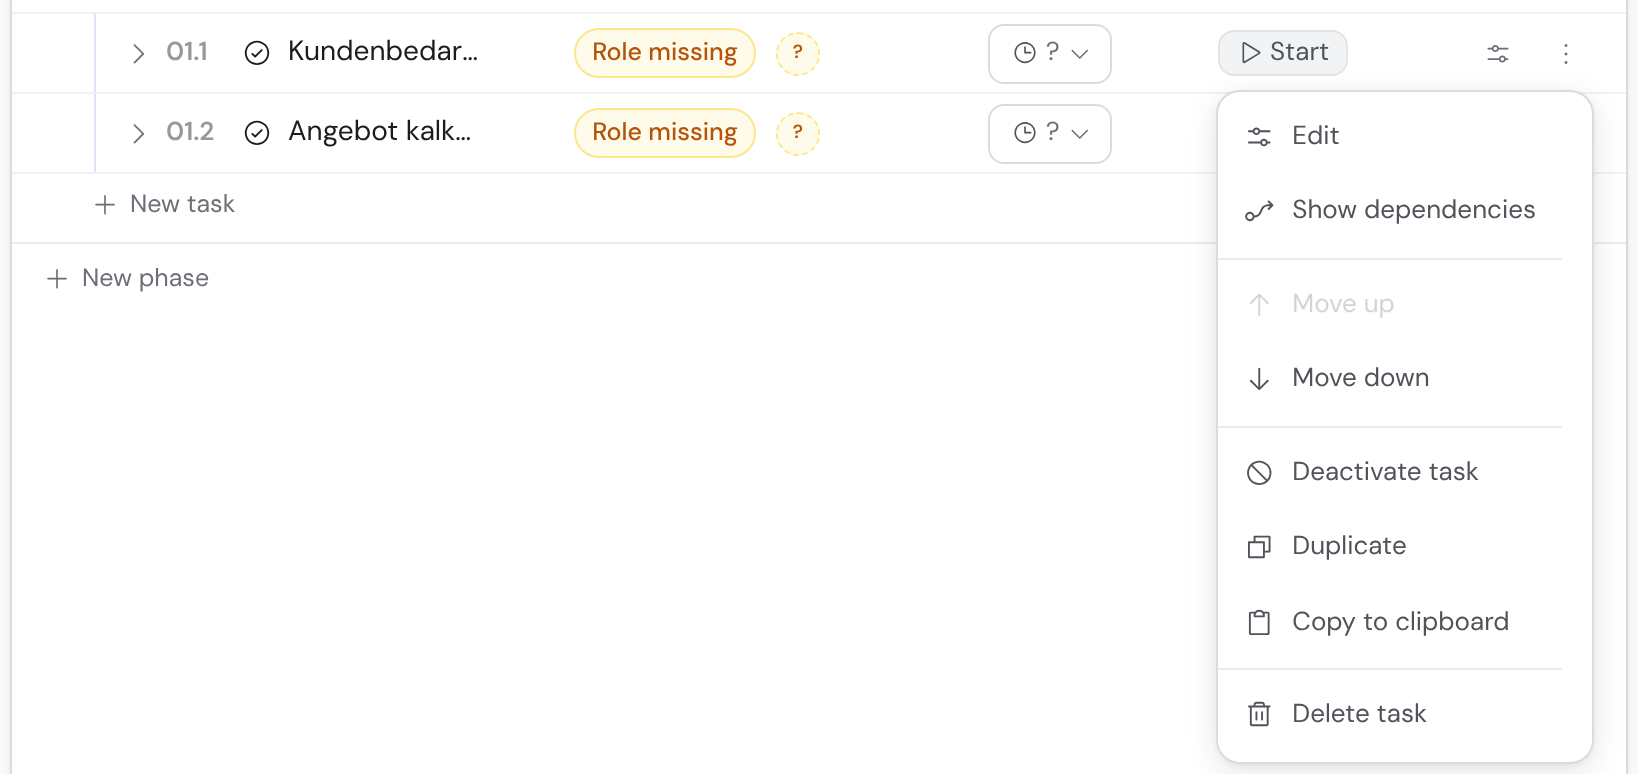
If you don't need a building block in a template right now, you don't have to delete it: use “Deactivate task” in the ⋮ menu to switch it off. The same works for whole phases and workflows — their ⋮ menus offer “Deactivate phase” and “Deactivate workflow” respectively; if you've selected several blocks of the same level, “Deactivate” in the selection bar switches them off together. Deactivated blocks stay visible in the template — dimmed and marked “Inactive” — and can be switched back on any time via “… activate”. In a new case a deactivated block still takes part, but is skipped the moment it would be its turn: you see the phase or task in the flow, clearly marked as skipped, and the case moves on. The order is what matters here — whatever follows a skipped phase starts only once the phase before it is done, not earlier. An inactive workflow, by contrast, is never started and no longer offered for selection; you pick workflows per case, so “deactivated” simply means “not selectable” there. Cases already running are unaffected — they keep the state the template had when they started; reactivating later applies only to new cases, never retroactively to running ones.
Deleting definitions — running cases stay untouched
To remove a building block permanently rather than just switching it off, delete it via “Delete” in the ⋮ menu — at every level (workflow, phase, task) and likewise for individual fields. With a multi-selection, the selection bar at the bottom deletes several siblings together. Deleting requires the template-management right. Deleting a block removes it from the template and from all cases started in the future; contained sub-blocks (e.g. the fields of a task) go with it. The confirmation dialog names the block — so before you confirm you can see exactly which task, phase, workflow or template you are deleting. With a multi-selection it lists the affected blocks; from six on it shows the first five and counts the rest.
Deleting does not affect running cases: every case runs against the version of the template that was captured when it started (the pinned snapshot), not against the current definition. A deleted workflow, phase, task or field therefore stays fully functional in cases already running; only new cases no longer know it. The confirmation dialog names this consequence before you delete.
One asymmetry is intentional: the template as a whole can only be deleted while no case references it — once cases exist, you deactivate the template instead. Individual building blocks (workflow, phase, task, field), by contrast, can be deleted at any time, because running cases carry themselves via their pinned snapshot. When you try to delete a template that is still in use, the message names exactly this reason.
Unlike duplicating or pasting, a deletion cannot be taken back with “Undo”. If you are unsure whether you'll need the block again, prefer “Deactivate task” for tasks — that is reversible and keeps the task dimmed but visible.
Reusing structure: duplicate, copy, multi-select
You rarely build large templates from scratch — a phase or task usually resembles an existing one. For that, every ⋮ menu in the editor (at the workflow, phase and task level) offers two paths. “Duplicate” places a full copy including everything it contains right next to it — the copy appears selected and is instantly renameable. “Copy to clipboard” remembers the subtree so you can paste it elsewhere — even into a different template. On paste Bricksta asks where: “Paste before” or “Paste after” a sibling, a whole task to the end of the target phase, and a new workflow via the ⋮ at the template head. References that make no sense in the target template (for example a role from a different organization) are deliberately dropped on paste, and the notice states how many.
You handle several like-for-like siblings in one go. Mark one via the selection box that appears when you hover a row (always visible on mobile) — the other siblings on the same level then show their box, and you add more. A bar at the bottom gathers the selection: “Duplicate”, “Copy” and “Delete” act on all selected entries together. The selection is intentionally limited to one level (only siblings under the same parent) — mark something on another level and a new selection starts. Duplicate and paste can be taken back entirely with a single “Undo”; delete asks for confirmation first.
Keyboard: with an active selection, copy via ⌘/Ctrl + C, duplicate via ⌘/Ctrl + D, and paste after the last selected entry via ⌘/Ctrl + V. Inside text fields the normal clipboard keeps priority.
Task type: done by a person or automatically
Not every task is done by a human. Via “Edit task” you open the task settings; at the very top you choose the task type. When you expand a task in the list, the button to the right of the preview heading takes you straight to the matching section — “Edit form” lands in the form, not on the details. Faster still, via the preview itself: clicking a field opens the settings right at that field instead of whichever one happens to be first. On the left sit the task's sections. “Details” (assignee, approval, due date, priority, documents) exists only for “Human” — on an automatic task there is nothing to set there: its assignee lives in the action settings, and a due date on it reminds nobody, because reminders require a responsible person. Under “Documents” you attach material your organization maintains centrally — the checklist, the leaflet, the price list. They are maintained under Organization › Documents; here you only pick which ones this task hands along. Whoever works on the task later finds them in the expanded task under “From the organization”, carrying the “Organization” badge and no edit or delete button — they do not belong to this case, and deleting one there would hit everybody else too. Replace a document centrally and cases already running show the new version right away. WHICH document a running task carries, by contrast, is fixed from its start: change the selection in the template and it applies to new cases. It is visible only to people who may see the task anyway. Then come the fields the task collects — called “Form” for “Human” and “Output fields” for “Agent”. Only “Human” adds “Auto emails”; “Message”, “Meeting invitation” and “Notification” collect no fields and get by with “Message”, “Appointment” resp. “Notice”. Next to each section you see its state — the number of fields, the number of auto emails, and a note when assignee or due date are still missing. “Human” is the normal task worked on by a responsible person. “Message” turns it into an automatic action step: as soon as it is due in the flow, Bricksta sends an email on its own — mid-process, without manual intervention. In the expanded task card you then see recipient, subject, and content instead of the previous form preview. “Meeting invitation” is the dedicated type for real calendar invites: same delivery path as “Message”, but with start date, duration, location and an optional Teams link — and no channel to pick, since invitations go out via Microsoft Outlook. “Notification” is the type for a short internal notice: it lands as a message in the Teams feed of the chosen members, together with a link back to the case. That path can only deliver ONE line by design — so there is no body field there, just the notice itself (150 characters at most), and only internal members can be picked as recipients. You can switch between “Message”, “Meeting invitation” and “Notification” at any time; recipients, subject and text are kept in full — a misclick in the bar costs you nothing. If a notification carries a recipient Teams cannot reach (fixed address, field recipient, contact), it is not deleted but marked in amber, and the section menu on the left says “Recipient not reachable”; it also shows up when you check the whole template. It is only skipped at send time — and if the step is waiting for your approval, the preview tells you up front how many recipients will drop out, instead of showing an address that is never written to. Not to be confused: under Settings › Notifications you set how YOU personally hear about events — that is a different thing from this task type. “Agent” turns the task into an AI step: you give an instruction (referencing case data via {{field}}), pick the agent's operating mode and a model tier. There are three operating modes, and each sits there as a card with its explanation — you do not have to open anything to see what it does: “Fill fields” writes the result into this task's output fields (those with a merge key) — summarising, sentiment, translation and classification all belong here; “Compose email” lets the AI write subject + text that are then delivered to a recipient via the send layer (as with “Message”); “Read from documents” reads the case's attachments (images/PDF, vision) and fills the fields from them. As with sending, it runs “automatically” or with “review result”.
- Trigger
- “Confirm before sending” presents the message to a person for approval — they see the prepared message (recipient, subject, text with values filled in) right at the task in the case and release it with “Send & complete”; “Send automatically” sends it without intervention as soon as the step is reached.
- Acting identity
- Under whose name the step acts. That role's field permissions still apply — the step may only do what this identity is allowed to.
- Recipient
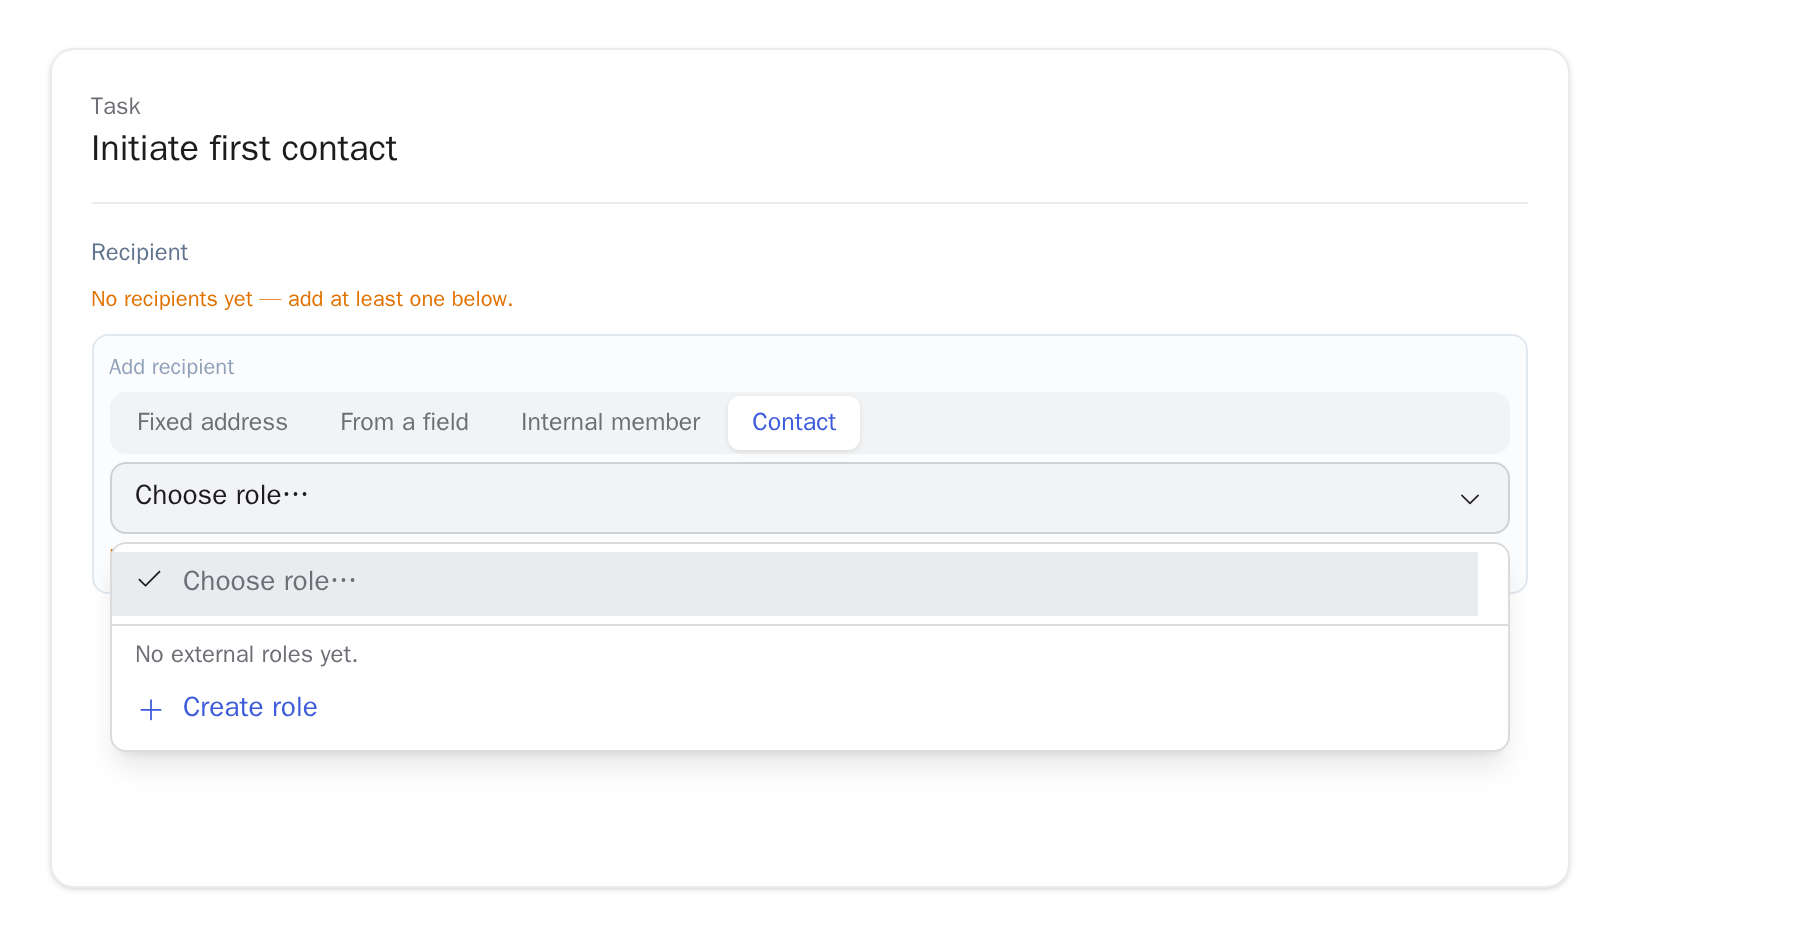
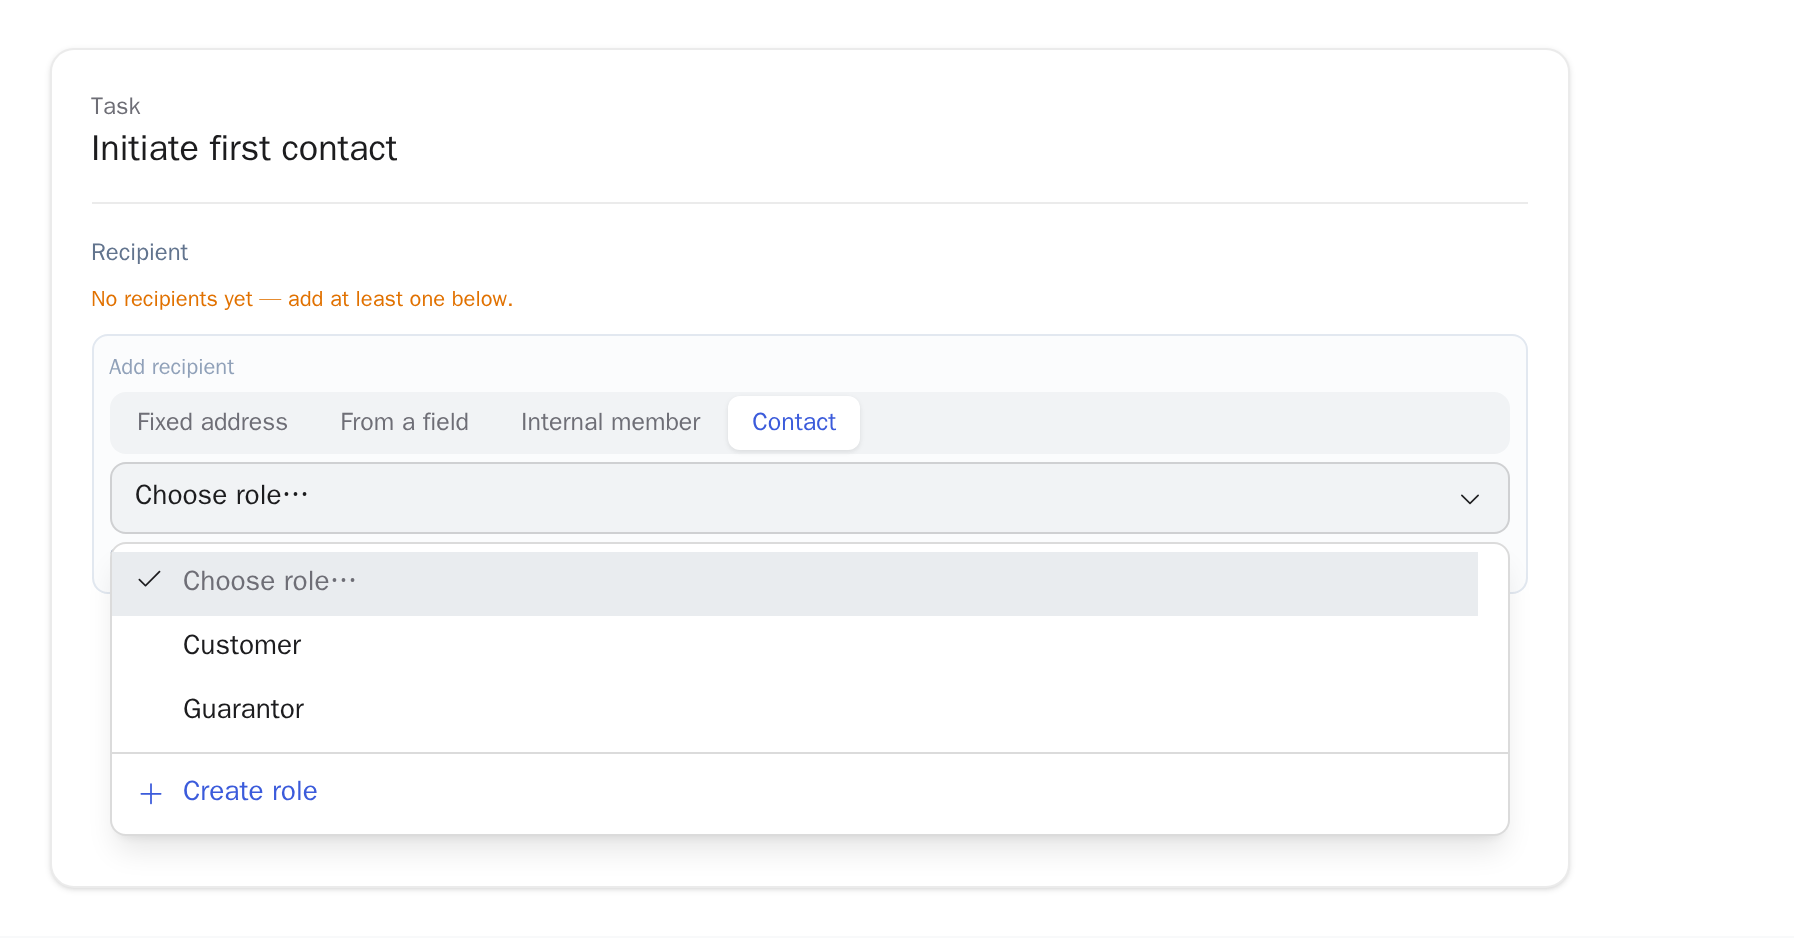
- You add one or more recipients — freely mixed across the four kinds. In the add bar you pick a kind and a value per entry; every added recipient shows as a chip you can remove again. For a calendar invitation all are invited as attendees; for an email all are on the distribution. The four kinds: a fixed email address, an email field of the case (whose value is inserted when sending), an internal member of your organization or a case contact in an external role (e.g. Customer). With the “Internal member” mode you pick a person from your organization directly from the list; Bricksta inserts their stored email address when sending — handy for notifying colleagues internally or inviting them to a meeting without typing the address by hand. All active members of the organization are offered. In the “From a field” recipient mode, Bricksta suggests every field with a merge key from true predecessor tasks of this step that can supply an address: email fields, member fields and contact fields. A member or contact field holds a person rather than an address — Bricksta inserts their stored address when sending. That lets you send to “the project lead picked in step 2” without capturing their address a second time. If the field allows several entries (a project team, say), every selected person becomes its own recipient. The dropdown groups the fields by phase; each entry shows which task it comes from and whether it is a member or contact field. Parallel or later tasks are not offered because their values may not exist yet when the message is sent; an already configured field stays selectable and is marked “later task”, so an existing setting never disappears from the editor without a word. Reused merge keys appear only once. A company field is deliberately not selectable — a company has no mailbox. If a person cannot be resolved when sending, because they left the organization or the field stayed empty, the preview says so explicitly (“N recipients have no address”) instead of quietly sending to fewer people. When the step runs automatically nobody sees a preview — Bricksta then records the number on the case’s message entry, so the loss stays findable afterwards. External roles are maintained under “Template settings” → “External roles”. In Contact mode, if no roles exist yet, Bricksta shows the hint below the role field and “Create role” takes you there; the opened role dropdown also contains the same plus action. If roles already exist, “Manage roles” stays visible below the field and the dropdown still lets you create another one. If you jump there from a concrete task, only fields from true predecessors of that task are suggested as recipient sources; globally, matching fields are ordered by process order. The concrete contact can still be added right at the task in the case.
- Template
- At the very top of a message task. Here you apply a subject-and-body block from the org-wide message library instead of writing it again; next to it, “Save as template” puts the current text there yourself. Applying makes a COPY — if subject or body already hold something, Bricksta asks first, and later changes to the template leave running processes untouched. Inserted fields are bound to the fields of THIS process; anything that cannot be resolved here is named to you and stays as readable text. “No template” releases the reference again — subject and message stay, because they have belonged to the task since you applied them; only the note about which template they came from is removed. Calendar invitations do not have this row.
- Subject and message
- Templates with placeholders: via “Insert field” you place a field at the cursor. It appears as a highlighted token carrying the field's name and is replaced with the case value when sending. Remove it with the ✕ on the token or with backspace — either way it goes as a whole, never half. Rename the field later and the token shows the new name without breaking the reference (what gets stored is the merge key, not the name). You can also type a field: write {{field name}} in double curly braces and it turns into the same token once the braces are closed. Only fields with a merge key from tasks that run before this send/AI step are suggested; fields from the current, parallel or later task are intentionally not available here. The suggestions are grouped by origin (workflow › phase › task), and the groups follow the process order — the same order as the recipient picker above, so you look in the same place in both lists. If a placeholder is left in that has no matching field in this process, the message is NOT sent: the step stays visible and names the unresolved label. A field that exists but was left empty is not affected — it is inserted as empty, as before.
- Retries before incident
- How often a failed step is retried automatically before it becomes visible as an incident. As an incident it waits for a person, who decides right at the task: “Retry” (back into the queue), “Complete manually” or “Skip” — the flow stalls visibly rather than silently and never runs on with garbage.
A “Message” step counts as done once the message is sent — not only when the recipient replies. That way a missing customer reply never blocks the flow. For a field to be usable as a {{placeholder}} or as a recipient, it needs a merge key (see field settings) and must come from a true predecessor of this step.
Tasks completed externally
A “Human” task doesn't have to be handled internally. Right in the “Responsible” field (on the “Details” tab) a toggle lets you decide who completes it: “Internal team” or “External”. When you pick “External”, the task no longer appears in the internal queue but in the case's customer portal — the external role fills in its form and completes it themselves. Internally it stays visible and carries the “External” badge, so everyone can see that an outside response is awaited here. This lets you build steps like “Upload documents” or “Confirm details” straight into the process without burdening the team with follow-up work. The choice is only available on “Human” tasks — action and AI steps run automatically anyway.
Once “External” is selected, the role field appears right below it — here you set which external role handles the task — e.g. Customer, Applicant or Guarantor. External roles are template-specific placeholders for people outside your organization — who fills a role is decided per case; you maintain them centrally under “Template settings” → “External roles”. So you don't have to leave the editor for that, the path there is built right into the field: if no role exists yet, Bricksta shows the hint “No external roles yet.” below the field and offers “Create role” — both as a plus action in the opened dropdown and as a link below the field; both open the template settings directly on the “External roles” tab. If roles already exist, you pick them in the dropdown; “Manage roles” stays visible below the field. The concrete contact (name, email) is added later on the running case.
You can make the same switch without opening the task settings: clicking the responsible chip in the task row opens the assignee picker, and below people and internal roles it now has a “To an external role (customer portal)” section. Picking a role there also switches the task to “External”. The note afterwards tells you what that means: all fields of this task become visible in the customer portal — so check beforehand whether internal notes are among them. An internal assignee set earlier is removed, so two responsibles never sit side by side; if the task had an approval by a manager or an external approver configured, that is dropped too and the note says so. The other way round, picking a person or an internal role brings the task back out of the customer portal. “Remove assignment” likewise brings an external task fully back to your team — so on that path a task never stays “external but without a role”, because then nobody would know who is supposed to do it. Via the toggle in the task settings that intermediate state is reachable, though (see “External without a role” below). External roles show as a hollow role glyph in the picker, so they are distinguishable from an internal role at a glance.
- Done externally
- Moves the task out of the internal queue into the case's customer portal. The external role fills in its form themselves; internally it shows the “External” badge. Only on “Human” tasks.
- External role
- The placeholder that handles the external task (e.g. Customer) — not a concrete person; who fills the role is decided per case. It appears in the “Responsible” field once the toggle is set to “External”. You maintain roles under “Template settings” → “External roles”; the “Create role” and “Manage roles” actions right at the field take you straight there.
- External without a role
- If the toggle is set to “External” but no external role is picked, the task reaches nobody on the outside: it appears in no customer portal and triggers no invitation. Nobody is responsible for it yet either, and while that stays the case it keeps its phase open. While building a template this is a normal intermediate step (switch first, then pick the role), so Bricksta does not block it. It shows up in three places: in the template overview the row carries an amber hint marker with the number of findings (spelled out on a phone, a number with a hover explanation on a computer); “Check template” reports it as a warning with a jump target; and in the case the task row carries an amber “External · no role” instead of the grey “External”. Two ways back: set an external role in the template, or switch the task to “Internal team” — that is the permanent fix. In a case that is already running it is enough to assign the task internally via the responsible chip; it can then be completed as usual, without touching the template.
- Approval required (4-eyes)
- Under “Details”: on completion the task first goes to another person for approval before it counts as done. You choose who approves right next to it — any admin, a specific role, or a concrete member.
What a task captures — the form
Every task can carry a form: the fields filled in while working on it. Whatever is captured here belongs to the case — it is available to later steps as a value, can drive dependencies (for example “Budget approved? is Yes”) and feeds into analytics. A good form asks for exactly what the next step needs — no more.
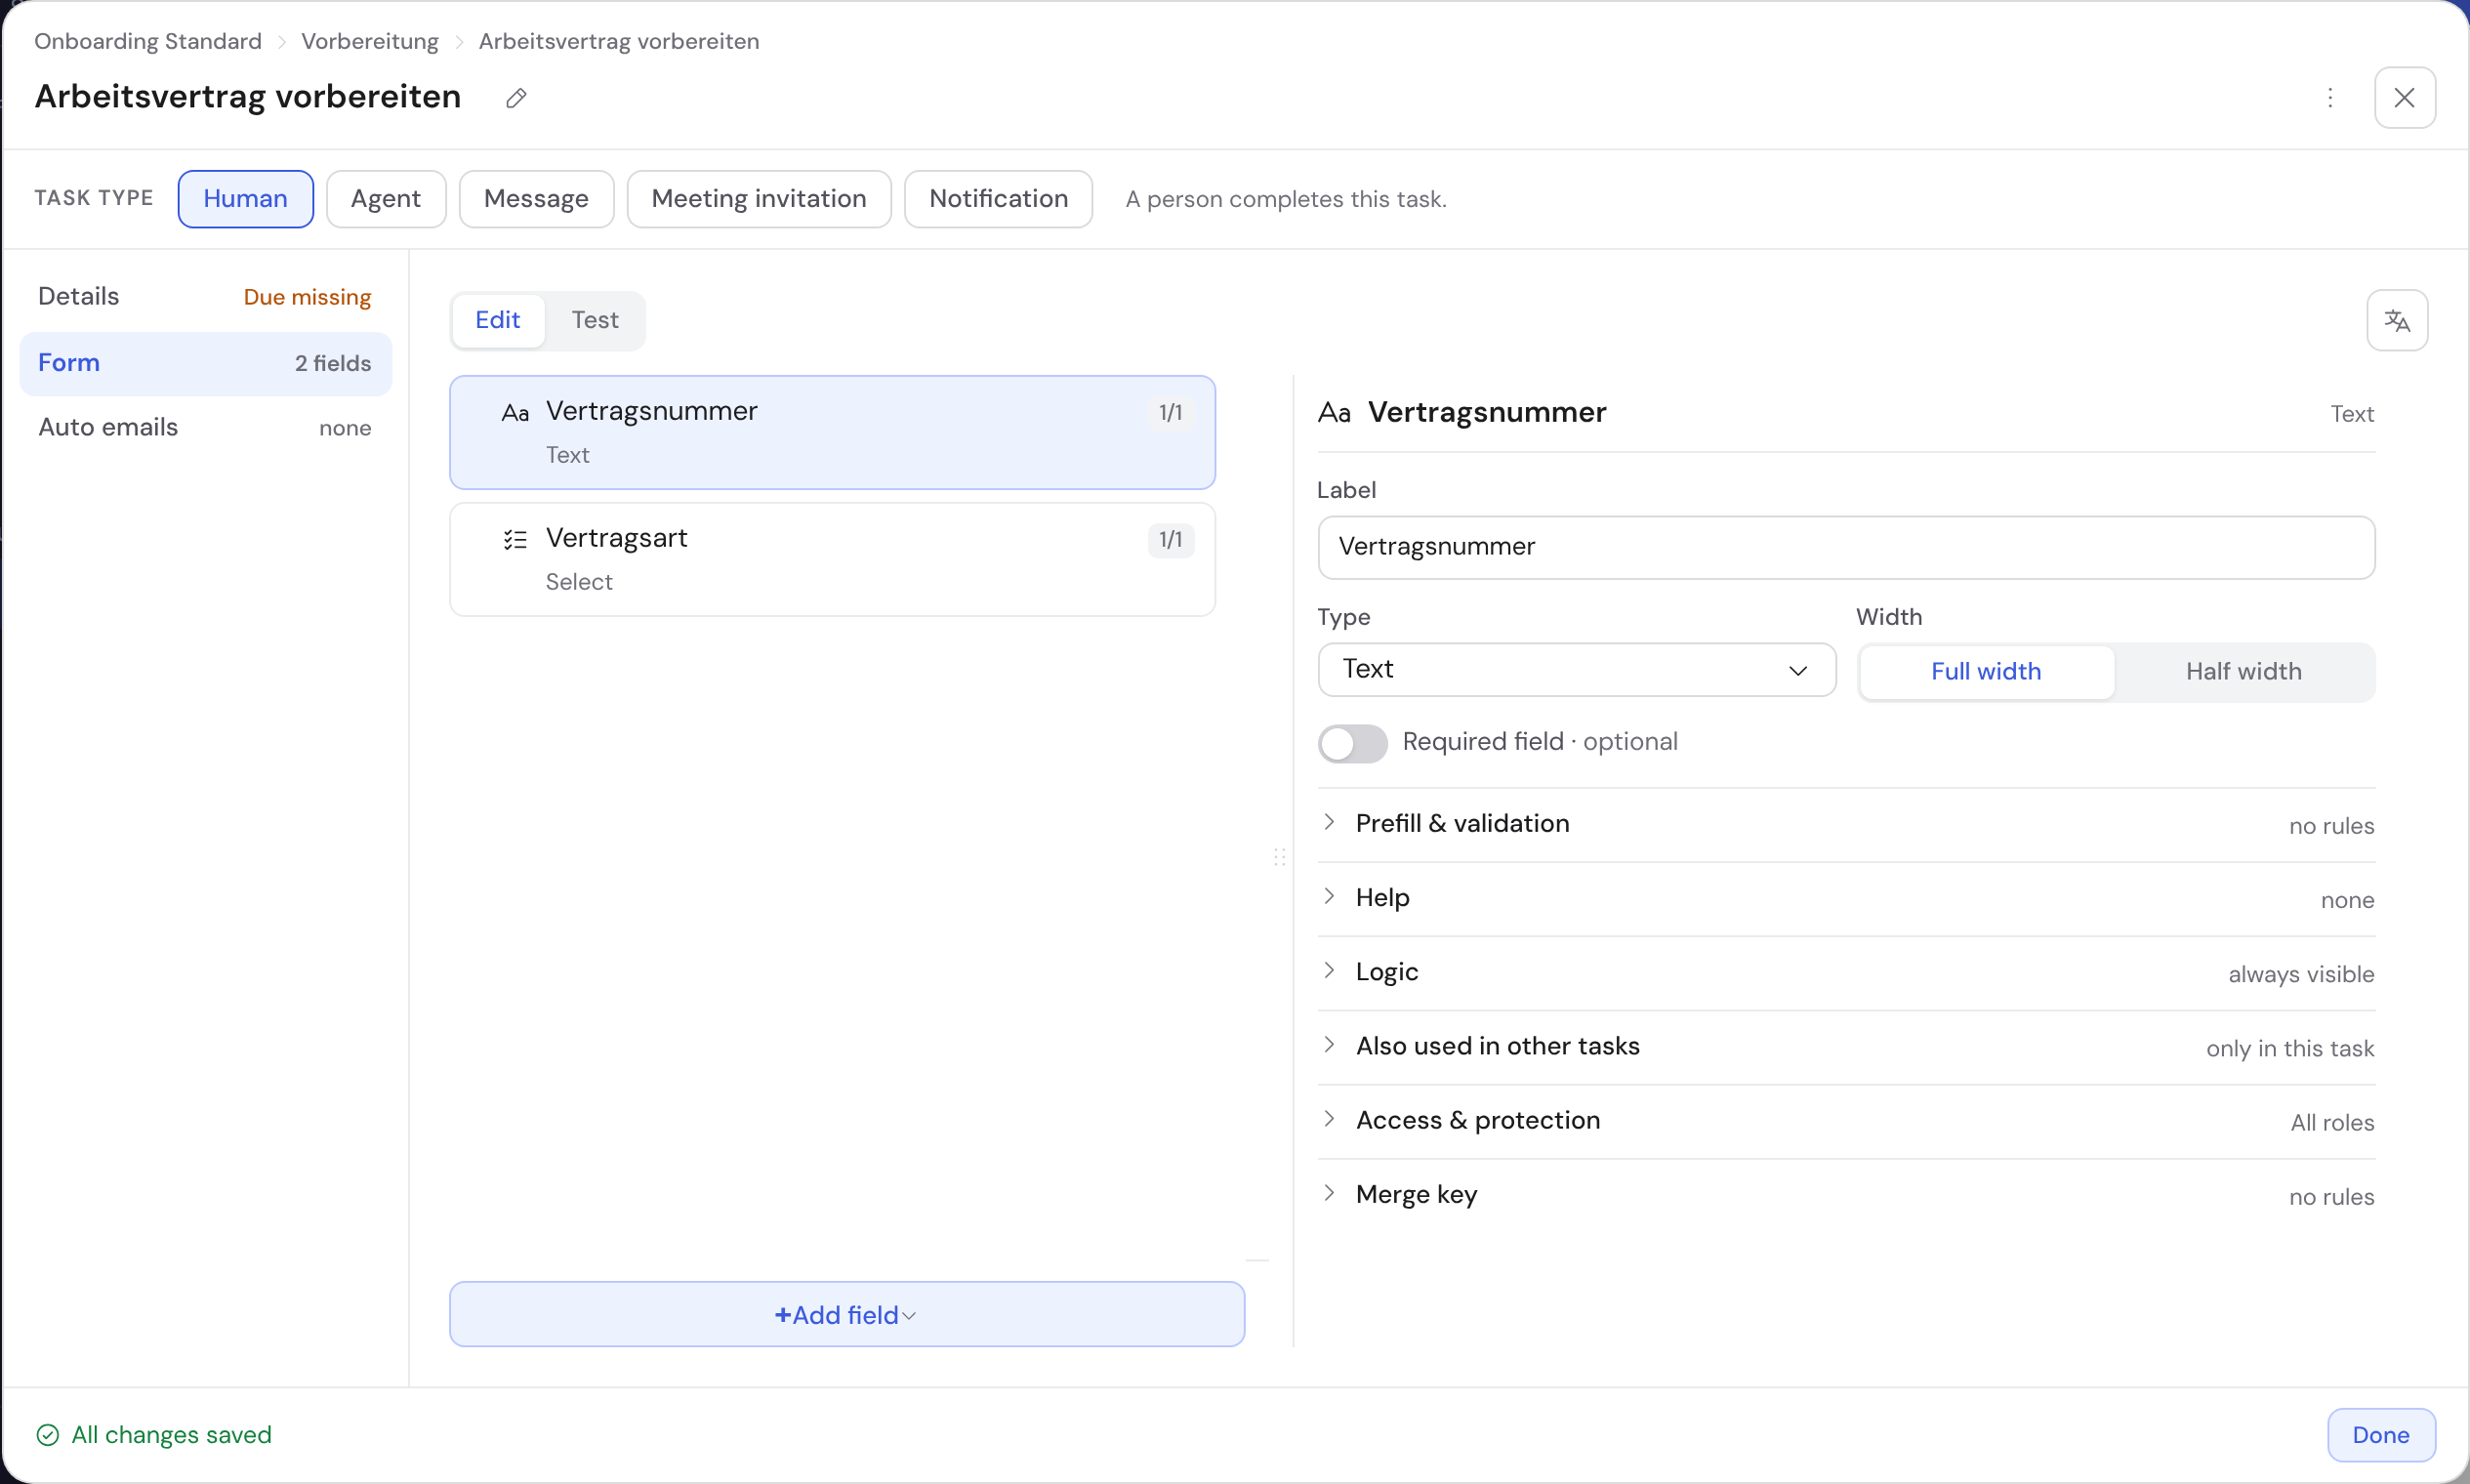
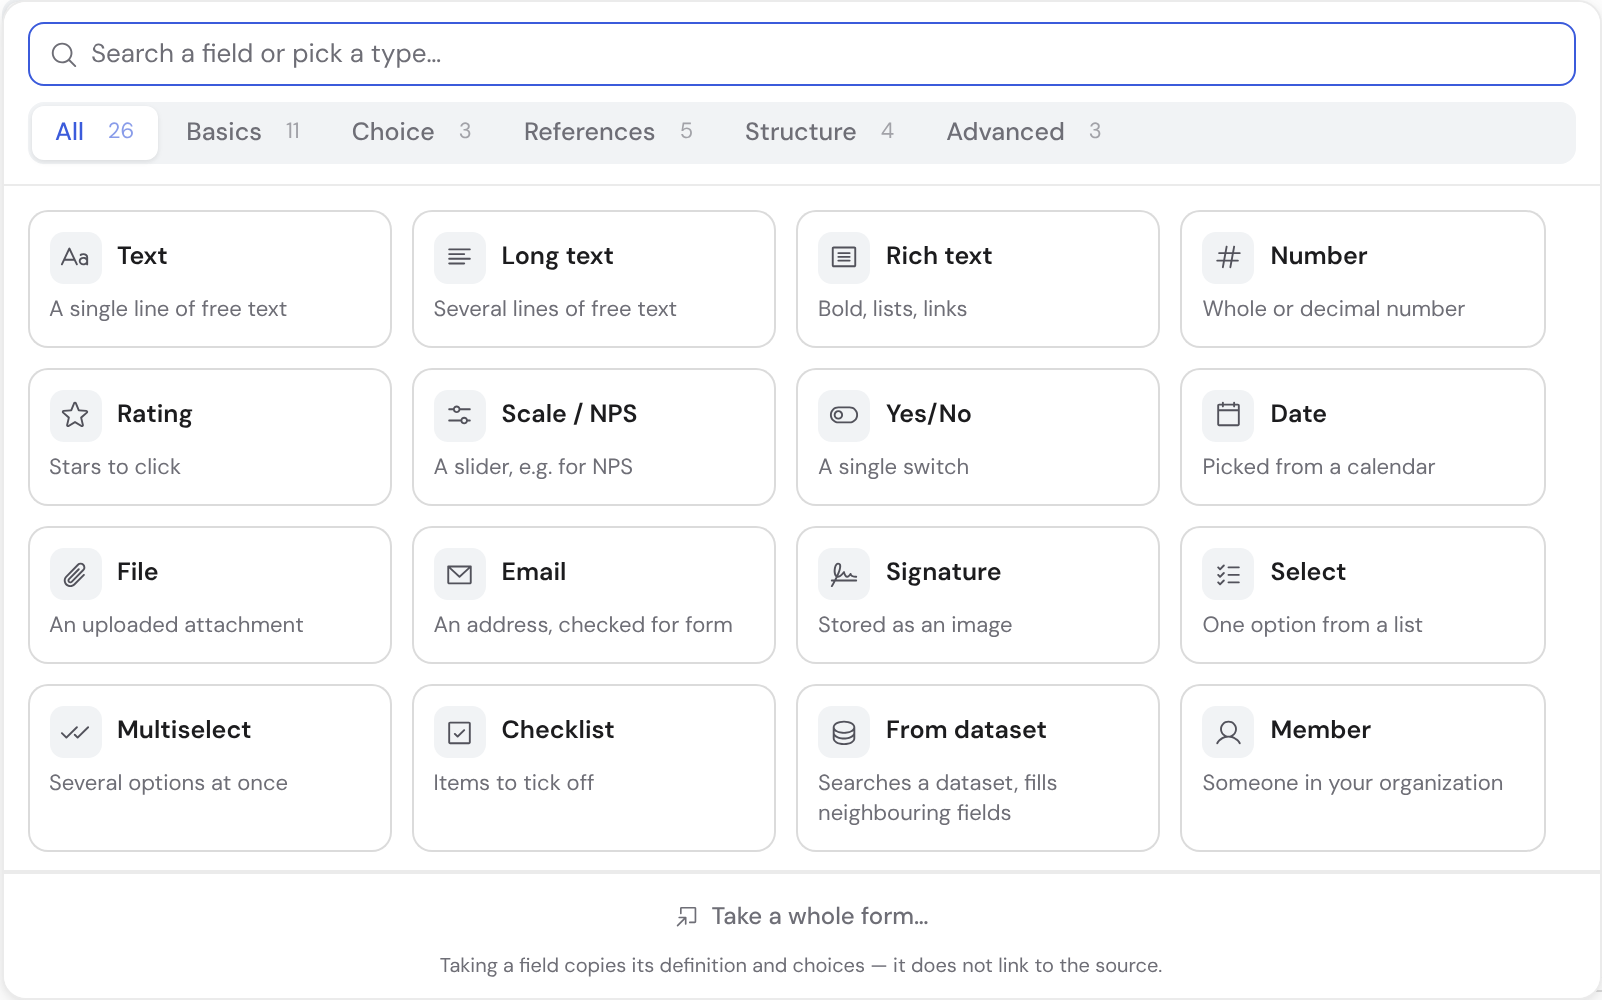
You build the form per task. “Add field” sits permanently at the foot of the field list — even when the list is long and you are near the top. The button opens a searchable menu: the types sit side by side as tiles, each with one line saying what it is for. The tabs above switch between all types and the categories (Basics, Choice, References, Structure, Advanced); picking one creates the field. The search covers those descriptions too: type “stars” and you find “Rating”, even though the word is not in its name. From the second character on, the same search box also finds fields that already exist in another task: each hit offers two ways, one below the other, and the difference matters. “Carry here” makes it ONE field with ONE value: whoever fills it in either task fills it for the whole case. “Copy here” creates a new, independent field with the same settings — the two values have nothing to do with each other afterwards. The origin is shown for both, because two tasks may well carry a field of the same name. Carrying only works for fields of the same template and only for types that can hold a value at the case (text, long text, number, date, yes/no, single select, person, file); for anything else only copying is offered. One exception among the file fields: a file field that accepts SEVERAL files cannot be carried — a carried file field holds exactly one file for the whole case. And if you only want to SHOW a value without it being editable here, the reference field is the right way. If you need a whole form rather than a single field, “Take a whole form…” at the foot of the menu leads to the source-task picker, where you tick which of its fields to bring along. Clicking a field opens the settings panel on the right. Label and field type sit at the top — the type can be changed later (except for calculated fields and a few special types); less-used logic (visible-/required-when, formula) is tucked away under “Advanced”. You reorder fields by dragging; “Full” or “Half” determines whether two fields sit side by side. The sub-fields of a repeatable group appear indented directly beneath their group — they belong to it and are edited there: clicking such a sub-row selects the group and jumps to that sub-field in the settings panel. Dragging reorders top-level fields only; the order inside a group is set in the group's section.
Settings almost every field has
Regardless of type, most fields share the same base settings — they explain the field, control whether it is required and govern who sees it:
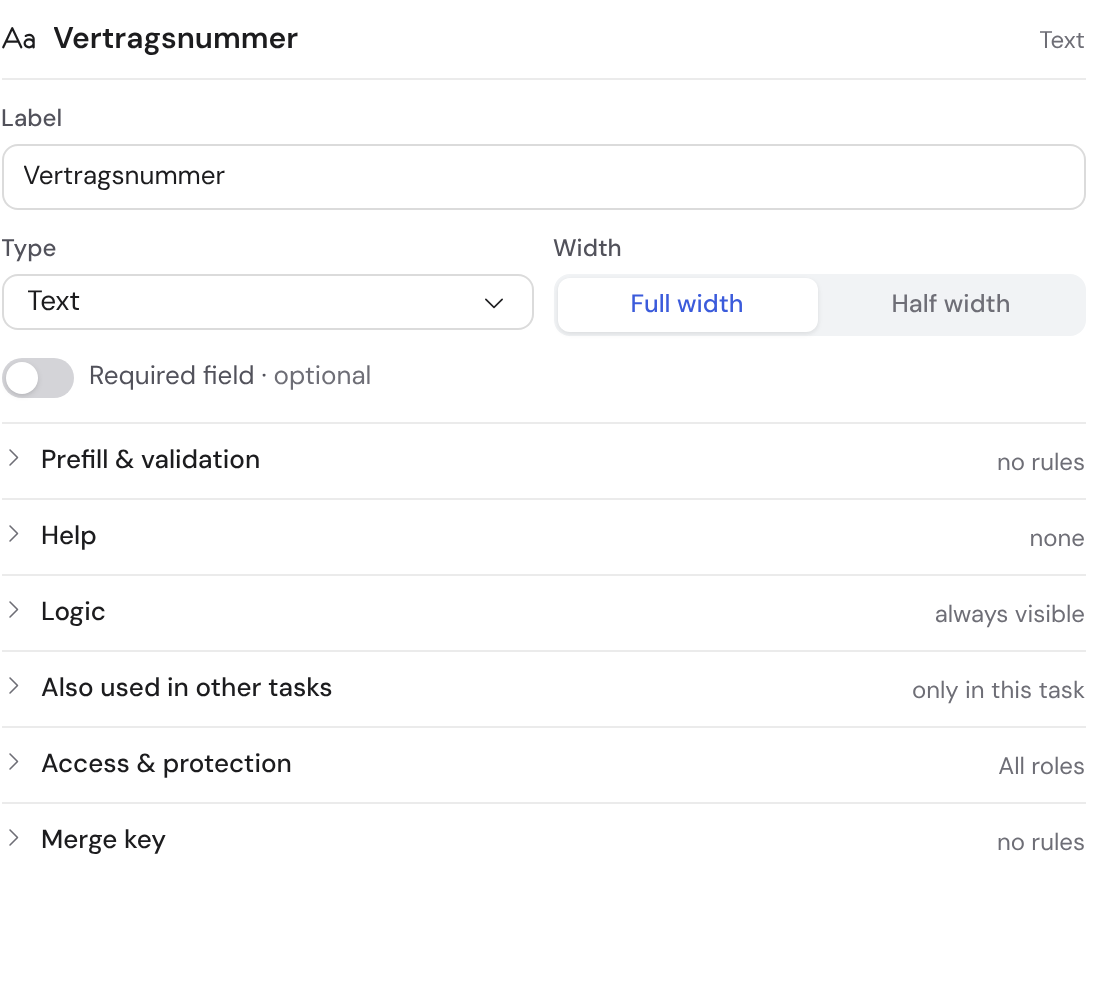
- Label
- The caption above the field. Conditions and formulas always address a field by this base label — independent of translations.
- Width
- “Full” takes the whole row, “Half” places two fields side by side — for compact forms.
- Required
- Must be filled before the task can be completed. Alternatively use only “Required when” — then the field is only mandatory under a condition. A field currently hidden by a “Visible when” rule is not enforced as required — it does not block completion while it stays hidden. Fields that are never filled in at all (computed fields, case field, rollup and reference) cannot be required — the toggle is not offered there.
- Help text
- A short hint shown directly below the field — for filling-in guidance.
- Description (tooltip)
- Appears as a ?-tooltip next to the label — for longer explanations that shouldn't clutter the form.
- PII (sensitive)
- Marks the field as personal or sensitive data (GDPR). Relevant for field-level retention.
- Field retention
- A separate period just for this field: once it elapses, this one value is cleared after the case is closed — independent of the retention of the whole template.
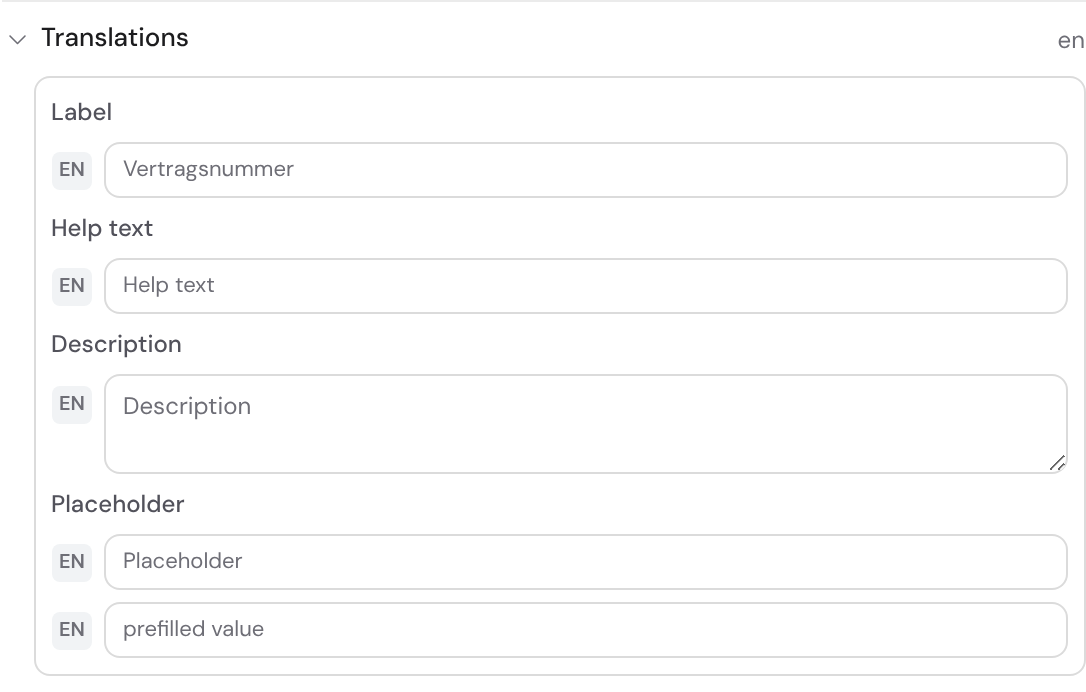
- Translations
- The Translations toggle at the top of the editor reveals the secondary languages; an editing-language switcher then picks one target language, and a translation field appears next to each name and field (with a “Out of date”/“AI · unreviewed” status where relevant). It is off by default — the editor stays single-language. Empty = base text; conditions and formulas always use the base text. This works uniformly for workflow, phase and task names as well as every filler-visible field text: label, help text, description, options, placeholder, prefilled value (for text), unit (for number) and the scale/slider endpoints.
- Field permissions (roles)
- Restricts which roles may see or fill the field. Empty = everyone. This lets you hide internal fields from external contributors, for example.
- Usable as a condition
- Makes this field's answer available as a controlling data point — other steps or fields can then depend on it.
- Merge key
- A stable key that makes this field usable as a placeholder in message templates, in conditions and as a recipient field. In subject and message you only see the field's name as a token; the key works behind it. You normally do not have to think about it: as soon as you name a field, Bricksta derives the key from that name (“Project lead (internal)” becomes project_lead_internal). If the same name occurs twice, a number is appended. Once assigned the key does NOT follow later renames — messages and conditions point at it, and silently moving it would break those references. You can rename or remove it yourself at any time. Fields without a stored value of their own deliberately get none: section and info text, reference and rollup fields, file and signature, and the context field (there the key names the case data point instead).
- Exclude from AI steps
- Masks the field value for AI steps (data minimisation, GDPR). Regular email sending is not affected.
The field types in detail
Bricksta knows 26 field types — from simple text inputs through choice and file to calculated values and live data from external systems. Here is each type with its purpose, how it renders and its type-specific settings, grouped by kind.
- Text
- Single-line input for short entries (name, reference, subject). Configurable: placeholder, default value, maximum length, pattern (regular expression with presets for email and phone) and an input mask (IBAN or phone).
- Long text
- Multi-line text field for descriptions, notes or justifications. Like Text with placeholder, default, maximum length and pattern — but without a mask.
- Email address
- Single-line field specifically for email addresses. The format is checked on blur; in the overview the address appears as a clickable mailto link.
Numbers, ratings and scales
- Number
- Numeric input. Optionally with minimum/maximum, a unit suffix (e.g. €, %, kg, pcs, h — shown after the number, only the number is stored), an input mask (currency or percent) and display as a slider with a freely chosen step.
- Rating (1–5)
- Five-star rating. Either as stars or as a slider; with the slider the two endpoints can be labelled.
- Scale / NPS (0–10)
- A button scale, 0–10 by default (classic NPS). The range is adjustable via min/max, and the two endpoints can be labelled (e.g. “unlikely” ↔ “very likely”).
Date and Yes/No
- Date
- Date picker with a calendar. Bounds are configurable — fixed values or relative to today (“future only from today”, “past only up to today”). Placeholder and default value possible.
- Yes/No
- A confirmation field with two values. On top of the normal required flag there is “Must be confirmed with Yes”: the task can then only be completed once Yes is explicitly selected here (an affirmative mandatory confirmation, e.g. for approvals).
Choice fields
- Choice
- One option from a list. Each option can carry a colour and an icon; individual options may allow free text (“Other”). A choice can depend on another choice — then only the options matching the parent option are shown (dependent, cascading choice).
- Multi-select
- Like Choice, but several options can be selected at once. It too can depend on a controlling choice.
- Checklist (with progress)
- A list of checkable items with visible progress — good for “all steps done?” checks within a single task.
- Member (person)
- Pick an internal person — e.g. an owner, contact or reviewer. Only members eligible to be assigned in the case are selectable; in external (guest) forms the picker is hidden. With the “Allow multiple” switch (the “Cardinality” panel) the field becomes multi-valued: you pick several people, each shown as a removable chip — handy for assembling a project team.
- Contact (external)
- An external contact — e.g. the contact person named by the customer. When filling in, you search for an existing contact or create one inline (email, first name, last name, phone, function and optionally the company); newly created contacts land in the org-wide contact list and are selectable everywhere afterwards. External contacts are their own entity, independent of internal members. In guest/portal forms the picker stays empty (no organisation context). With “Allow multiple” you keep several contacts as a chip list.
- Company (external)
- An external company (customer) a contact belongs to. Select or create just like a contact; the org-wide company list prevents duplicates and keeps contacts cleanly grouped. With “Allow multiple” you can capture several companies as a chip list.
Evidence and signature
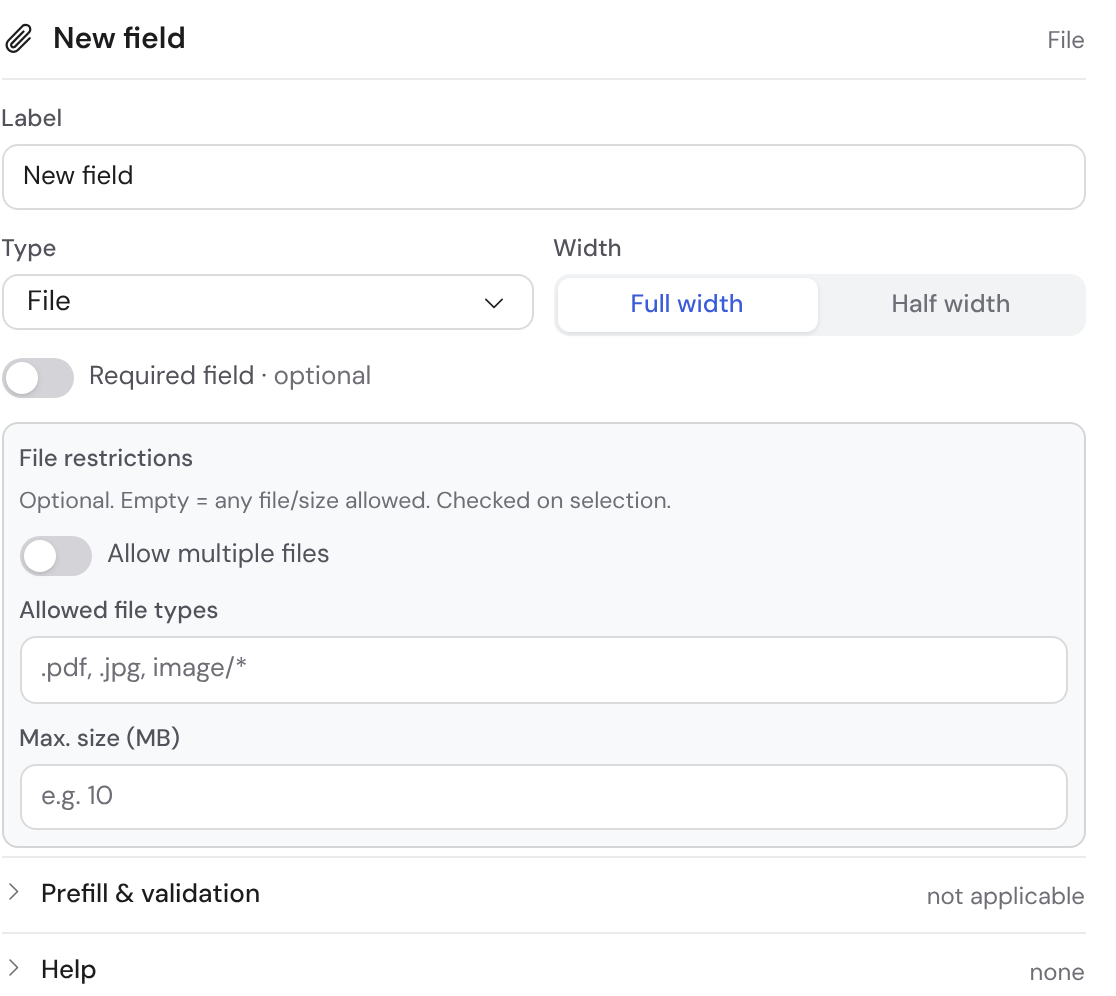
- File upload
- Attaching files. Configurable: allow multiple files, permitted file types (e.g. “.pdf, .jpg, image/*”) and the maximum size per file in MB.
- Signature
- A field signed directly with mouse or finger — for approvals and confirmations with visible evidence.
Structure and notes
- Section
- A sub-heading that groups the following fields and bundles them into their own step in the form. It always takes the full width and captures no value itself.
- Info / note text
- A plain text block with no input — for explanations in the middle of the form. The label is the optional title, the note text is the body; bold (with **…**) and line breaks are kept, and field references as in formulas insert already-captured answers.
Calculated and repeatable fields
- Repeatable group
- A block that repeats as rows any number of times — for example the line items of an order. A group's sub-fields are Text, Number, Date, Yes/No, Choice, Member, Contact, Company, Email or From dataset — so you can capture several contact persons or several purchased products in one step. When a sub-field is of type “From dataset”, a selection per row auto-fills the mapped neighbour sub-fields of that same row (e.g. product → price). The group has no width of its own — it always takes the full row. It does have a Required setting, in two levels: if the GROUP is required, at least one row must exist or the task cannot be completed; required SUB-fields apply on top of that, per row already added. Before the first row exists, the group shows a greyed-out sample row listing its sub-fields — so it is clear up front what each row collects; clicking it creates the first real row. In the expanded task of the template editor the group appears as the same kind of block: its sub-fields sit inside it, not next to it as separate form fields.
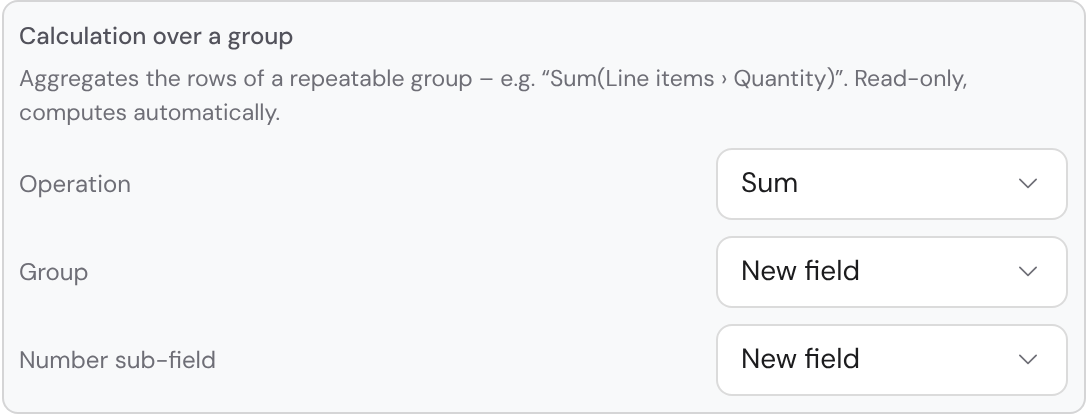
- Group rollup (calculated)
- Aggregates the rows of a repeatable group over a number or rating sub-field — as sum, count, average, minimum or maximum (e.g. “Sum(Line items › Quantity)”). Read-only, computed automatically.
- Calculated field (formula)
- Not a type of its own but a switch on many fields: enter a formula and the field becomes read-only and computes itself from other fields you reference via {FieldName} (e.g. {Quantity} * {UnitPrice}).
Values from the case and from external systems
- Case field (read-only)
- Shows a value of the case read-only in the form — case type, title, priority, due date or creation date. It captures nothing new but makes context visible right where you work.
- Reference (value from earlier task)
- Shows, read-only, the value captured in a field of a task that runs earlier in the flow — for example the customer goal recorded in the intake task, displayed again in a later task. You can pick fields from ALL tasks that come before this one in the flow, not just its immediate predecessor; the value is resolved per case at runtime and never re-entered. Any field type with a displayable value works as a source: Text, Long text, Rich text (shown as plain text without formatting), Number, Rating, Scale, Date, Yes/No, Select, Multi-select and Checklist (showing the chosen labels), Email, Member, Contact and Company (showing the name), plus dataset and external-system lookups. A sub-field of a repeatable group can be a source too — it then shows the values of all rows, comma-separated; the group itself, being a container, cannot. Still excluded are fields without a displayable stored value: File, Signature, computed fields (formula/rollup), Case field and Reference. Because a reference field stores no value of its own, its settings panel deliberately offers less than other fields: no “Required” and no “Required when” (there is nothing to fill in that could block completion), no “Fillable by”, no PII flag, no field retention, no AI exclusion, no “Usable as a condition” and no merge key. Those settings belong on the SOURCE field — that is where they take effect, and once the source value is cleared at the end of its retention period, the reference shows “—” by itself. What does apply to a reference field: label, width, help text, description, “Visible when” and “Visible to”.
- Live lookup (external system)
- Searches and selects a record in a connected external system (e.g. Jira or HubSpot). It serves as the anchor from which “live values” draw their attributes. See the article “Integration fields”.
- Live value (external system)
- Derives a single attribute from a preceding “live lookup” (e.g. the status or a date of the linked record) — optionally aggregated. Read-only, updates from the external system.
Options in choice fields
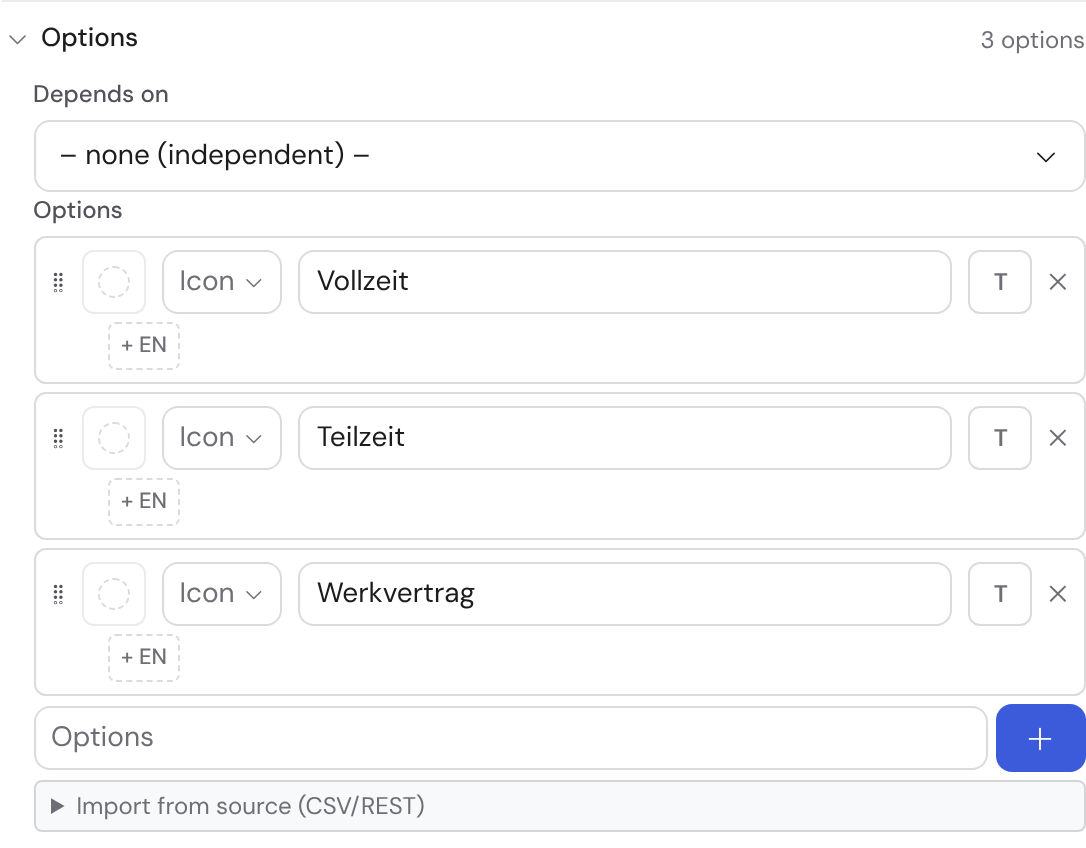
Choice, multi-select and checklist work with an option list that you maintain freely:
- Reorder by dragging; add or delete options individually.
- Colour and icon per option — for status and choice lists that read faster.
- Allow free text per option (“Other”): if the person picks this option, they can additionally type something.
- Dependent choice: a choice field can be subordinated to another. Then assign each option to a parent option — only the matching ones are shown.
- Translation per option: when translations are shown, each option gets a translation field for the target language chosen in the switcher.
Validation and format
Depending on the type you restrict valid entries or format them — so data is captured cleanly while filling in rather than corrected afterwards:
- Min/max for Number and Scale.
- Unit suffix for Number (e.g. kg) — display only, the number is stored.
- Slider with a step for Number and Rating; endpoint labels for the Scale.
- Date bounds for Date: fixed or relative to today (future only, past only).
- Maximum length for Text and Long text.
- Pattern (regular expression) for Text and Long text, with ready-made presets for email and phone.
- Input mask: currency or percent (Number) or IBAN or phone (Text) — formats the display only, the raw value is stored.
- File constraints: permitted types, maximum size per file, allow multiple files.
Conditional visibility and requirement
Two conditions steer a field dynamically: “Visible when” only shows it when a condition on another field is met; “Required when” only makes it mandatory then. You build the condition in the same builder as the flow conditions — field, operator and value (e.g. “Reason is Other”). This keeps the form lean and shows only what is relevant right now.

Keep forms as lean as possible: ask only for what the next step really needs. Use “Visible when” to surface special cases only on demand instead of showing every field permanently.
Carrying a field across several tasks
Some entries accompany the whole case: a customer number, a file reference, a date of receipt. Until now you had to create them again in every task — and ended up with as many values as tasks. The field inspector has a section “Also used in other tasks” for this. Pick the tasks whose form should show the field as well. It stays ONE field: whoever fills it in or changes it in any of those tasks changes the value for the entire case — and everyone sees it immediately. That is also why it appears in the form only once, no matter how many tasks carry it.
For each task you decide what is possible there. “Can edit” means the task may set and change the value. “Read only” shows it without allowing changes — useful when a later task needs to know the entry but must not touch it. “Do not show” takes the field out of the form but keeps carrying it: conditions and deadlines built on it keep working.
“Do not show” is not a statement about confidentiality. It tidies up the form, nothing more. If an entry should reach only certain people, use “Visible for” in the rights and protection section — that is the setting which really limits who sees the value.
You can set the same thing from the other side — in the task where the field is meant to appear. Its field list shows every field carried here with a dashed frame, the name of its home task and the note “one value”. There you change the level, or end the carry at this one place without touching the other tasks. And you position the field by dragging, exactly like the task’s own fields: it sits where you put it, not necessarily at the end. Each task keeps its own order — the same field may sit near the top in one task and near the bottom in another.
In test mode a carried field appears in its place, but without an input: instead you see a note naming the task it is carried from. That is not a gap in the preview but its honest answer — the value only exists in a running case, and an empty input would promise something test mode cannot deliver.
Not every field can be carried, and the editor tells you why: fields created inside a single case only, sub-fields of repeatable groups (whose value lives in the group row), fields that are already the source of a reference, and fields belonging to tasks filled in externally. External tasks are not offered as a target for the same reason — what is visible outside stays deliberately bound to that one task.
In the task a field is carried into, you see it under “Carried in from other tasks” — with its origin and the level that applies there. You can change the level there too, or stop carrying it here; it is the same setting as in the field inspector of the origin task, just from the other side. You cannot delete the field here: it belongs to its home task.
This setting takes effect from the NEXT case onwards. When a case is created it records which fields it carries where — if you change the assignment in the template later, running cases stay as they started. So removing an assignment to repair a running case will not change anything there.
Category and structure map
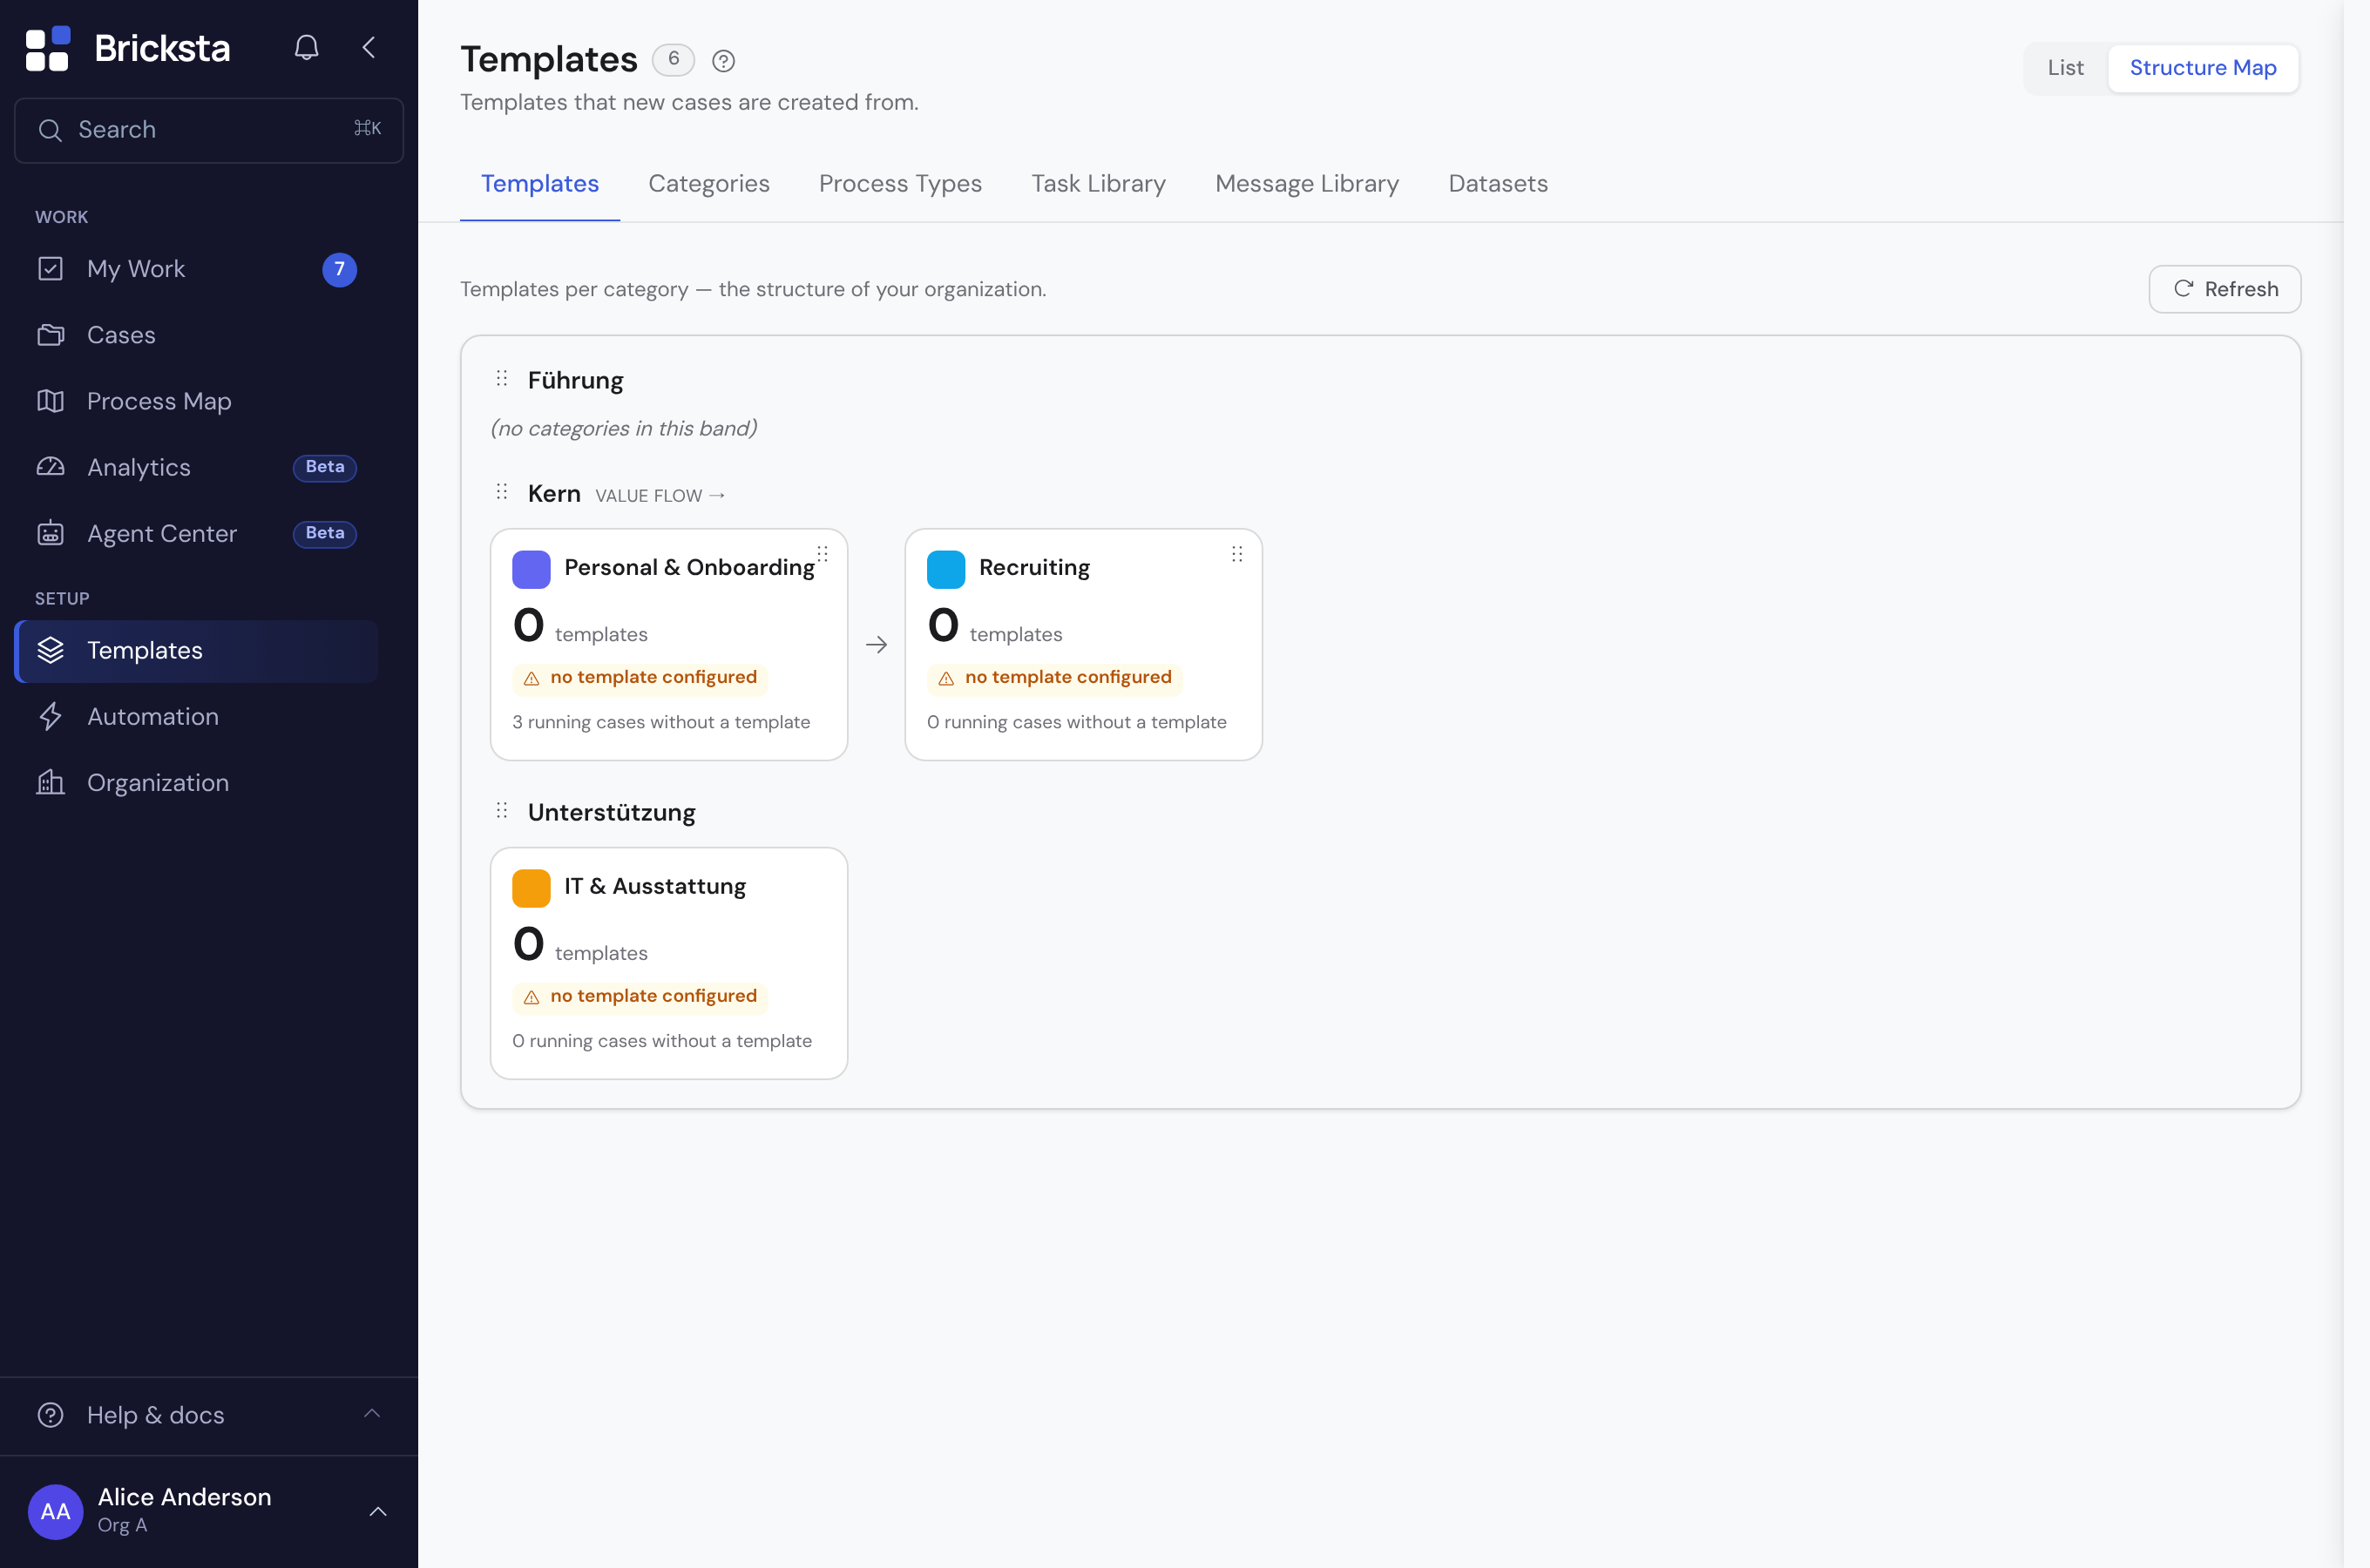
Assign the template to a category. The category determines where the template appears in the process map, and is inherited by the cases created from it. Via the “List / Structure Map” toggle at the top of the templates page you see your templates as a map — ordered by process type and category.
Generating a template automatically
Instead of creating every step by hand, choose “Describe with AI” under “Create template” and describe your flow in a sentence or two. Bricksta derives workflows, phases, tasks, order and sensible fields from it. While it generates, a full-screen view shows which step is running (workflows, phases, tasks, fields …) and how the template takes shape live. When it is done, it opens straight in the editor — where you review it and adjust it if needed.
You don’t have to type the whole flow: under “Attach documents or BPMN” you can attach existing material — process descriptions (PDF, Word), screenshots or diagrams, spreadsheets, or a BPMN export from a modelling tool. You can also paste a file or image straight from the clipboard (Ctrl+V) — for example a screenshot you just took. Bricksta reads them and builds the template on that basis; a short extra note is optional. For a BPMN export Bricksta keeps the tasks, their order and the branches faithfully; how far the AI may add to them is controlled under “Options → BPMN enrichment”. Before it builds, Bricksta briefly shows the detected structure (tasks, branches, roles) for you to confirm; if the model holds several processes, you pick which ones each become their own template.
Refining and publishing existing templates
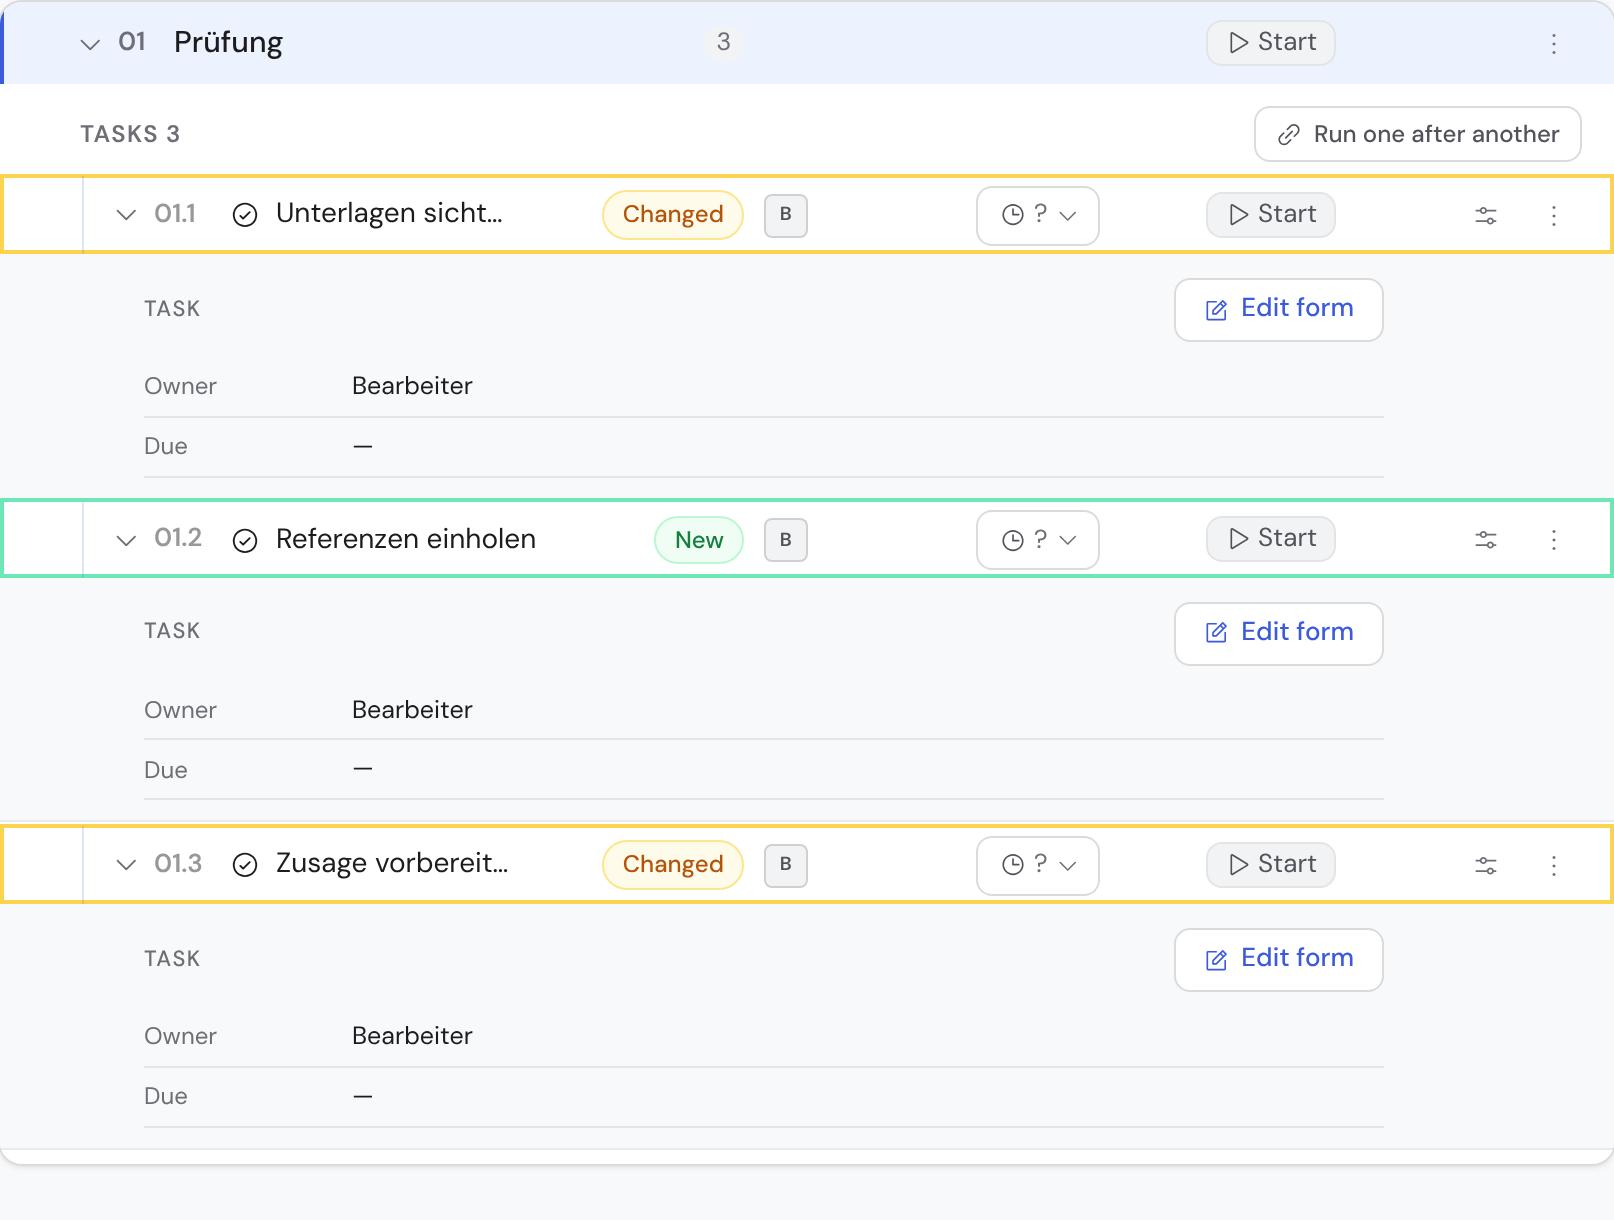
You can evolve a template at any time via “Edit with AI” — add tasks, make a phase optional, refine fields or reorder things (the workflows of the template, the phases of a workflow, the tasks of a phase). When reordering, the AI sets the order you would have set yourself — so it only takes effect where no dependency says otherwise. A step pinned by a dependency stays where it is — and Bricksta does not mark it as moved either: a position only appears on a row that really did move somewhere else. To actually change the flow, tell the AI in terms of dependencies (“B should only run after A”) or use “Run in sequence”. You can also attach documents or a BPMN export to guide the change. The refinement always happens additively in the same template — literally so: building blocks that already exist are carried forward, not rebuilt. Everything you set by hand that the AI knows nothing about is therefore preserved: who has to approve, who is responsible, due-date anchors, file restrictions, attached documents, field mappings and option colours. The flip side: the AI cannot remove anything either. If it leaves a task or a field out, the building block stays — the banner then lists it under “left out by the AI”, and you delete it here in the editor. Whatever the AI changed is then highlighted in the editor — green for new, amber for changed — and a banner above the structure states the tally until you confirm it with “Mark as read”. When something was merely moved, the marker names the two positions instead of the word (for example “5 → 1”), and the banner says how many moves the AI reported — the rows show you which of them the dependencies actually allowed. When reordering, Bricksta asks the AI for a short rationale per position; it appears in the marker's tooltip, so you can judge a move instead of just seeing it. “AI rationale” in the banner expands all of them at once — including those for positions the AI deliberately left alone. Those are worth a look: if the sentence there does not hold up, the AI did not check that position, it assumed it was right. Even when the AI changes nothing, the banner stays and says “no change needed” — the rationale is then the entire result of the run and would otherwise be nowhere to be seen. If nothing was left to highlight, Bricksta says so plainly instead of promising highlights that do not exist. And if the AI returns a position for only some of the workflows when reordering, Bricksta stops the run and leaves the template untouched — an incomplete list yields no unambiguous order, and a half-reordered template would be worse than no change at all. Via “Publish” the changed state takes effect for new cases; Bricksta checks the template first and stops if blocking issues remain.


A new version never overwrites running cases: if a case is already running from the template, it stays untouched by the change and continues with its own version (shown in the case header as “v2” or similar).
A template's history
Via “History” in the template editor's three-dot menu you see how the template has evolved over time — and by whom. Every change is logged: workflows, phases, tasks and fields that were added, renamed, changed or removed, plus settings changes, AI revisions and version publications. Each row names the time, the action, the affected object and the person. For renames and value changes the entry shows the concrete difference as “old → new” (e.g. “Active: Yes → No”); changes to role or assignee appear with names instead of just “changed”, and an AI revision shows the tally “N added · M changed · K left out” — “left out” because an AI revision never deletes individual building blocks: whatever the AI no longer mentions stays in the template, and you remove it here in the editor if you want it gone. Use the search box to filter the history by keyword. It is the same activity trail as in a case.
Sharing a template
Via the share icon at the top of the template editor you hand a template to colleagues — in two ways: “Copy link” puts the template’s address on your clipboard, “Notify people” selects one or more people in your organization. Selecting doesn’t fire anything right away: you collect the recipients as chips, can optionally add a short message, and only “Notify” sends everything at once. Each notified person gets a notice inside Bricksta plus an email — each with a direct link to the template. Reopening the menu marks whom you have already notified. It is the same share menu as in a case.
Good templates
- Every task has exactly one clearly nameable owner.
- Captured fields are as lean as possible — only what the next step really needs.
- The flow describes the normal case; special cases are handled in the case, not in the template.
- Dependencies only where a step really waits for another — otherwise the flow stays needlessly sequential.